Unleashing the full power of Middleware with Enterspeed ⚡




For many years, middleware has played a crucial role in web development. It enables applications to operate smoothly and effectively to meet user demands.
It acts as a bridge between the UI (frontend) and the backend services, handling tasks such as authentication, routing, and data processing.
However, building and managing middleware isn’t always easy, especially when it comes to scalability, maintainability, and performance.
Luckily, frameworks like Next.js have moved the needle regarding innovating what is possible with middleware and how easy it is to use. For instance, they have made it really easy to work together with Edge functions, making it possible to personalise content based on the user’s geolocation.
💡 An edge function is a serverless function that runs at the edge. If you want to learn more about it, check out Netlify’s “Understanding Edge Functions: The Edge and Beyond”.
But as incredible as these innovations are, we’re still left with some challenges regarding middleware. Since it sits in the, you guessed it, middle, we risk that the middleware becomes a bottleneck, making the site slower and hurting the user experience.
The risk isn’t that high for small and simple sites, but as the sites become larger and more complex, the risk of introducing bottlenecks increases.
Fortunately, there are some great solutions out there which are designed to address these challenges. Can you guess the name of one of these solutions?

That’s right. Everything is coming up, Milhouse! I mean, Enterspeed (sorry).
Enterspeed lets you unleash the full power of your middleware. By acting as a middleware accelerator, it can optimise the performance of your application by reducing latency as well as server loads.
But first, let’s look at what middleware exactly is and what it can do.
There are several types of middleware, each with its own use case. The type of middleware we will be focusing on in this article is Application middleware.
Middleware is a layer of software that sits between the UI and backend services. It acts as a mediator, which allows the UI and the backend services to communicate and exchange data seamlessly.
The concept of middleware isn’t a new thing – it has been around since 1968.
As the name might suggest, it handles specific tasks within the application, such as data fetching, authentication, request/response handling, etc.
An example could be a user trying to access a page that requires authentication – e.g. an article behind a paywall.
The user (client) sends an HTTP request to the server for the URL (e.g. nnytimes.com/hero-robot-rescues-valuable-money). Before the article is returned, a piece of middleware kicks in.
The middleware checks if the user is signed in. If not, it redirects the user to /sign-in, else it continues to the article.
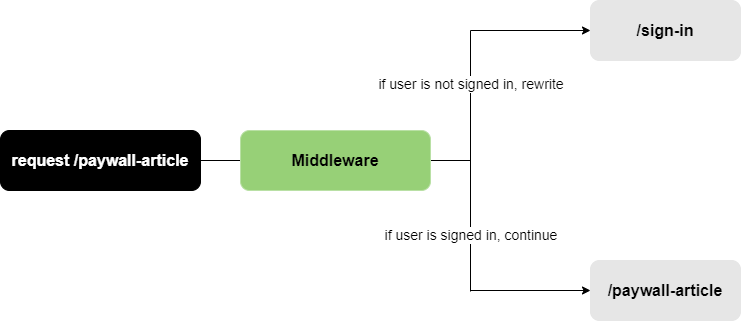
The authentication is often done using JWT (JSON Web Token), which can also include details like user role (e.g. subscriber, premium subscriber, super-duper-ultra-premium subscriber).
Other use cases for middleware can be:
As you can see, there are plenty of use cases to choose from.
For further reading, you can also dive into the middle layer is the new playing field.
Next, we’ll look into how we can use Enterspeed as a middleware accelerator.
When looking at slow-performing websites, we often see bottlenecks occurring during data fetching.
The reasons for that can be many things, for instance:
The list could go on. It all depends on how your setup and architecture look.
So how can Enterspeed help avoid these kinds of bottlenecks? We touched upon this in our last article, “All you (probably) need to know about caching on the web”, but to sum it up:
Enterspeed helps you offload your data, which you can combine with multiple data sources (as well as transform) in a Redis cache (in-memory storage). This essentially decouples your server, as well as makes your dynamic content static.
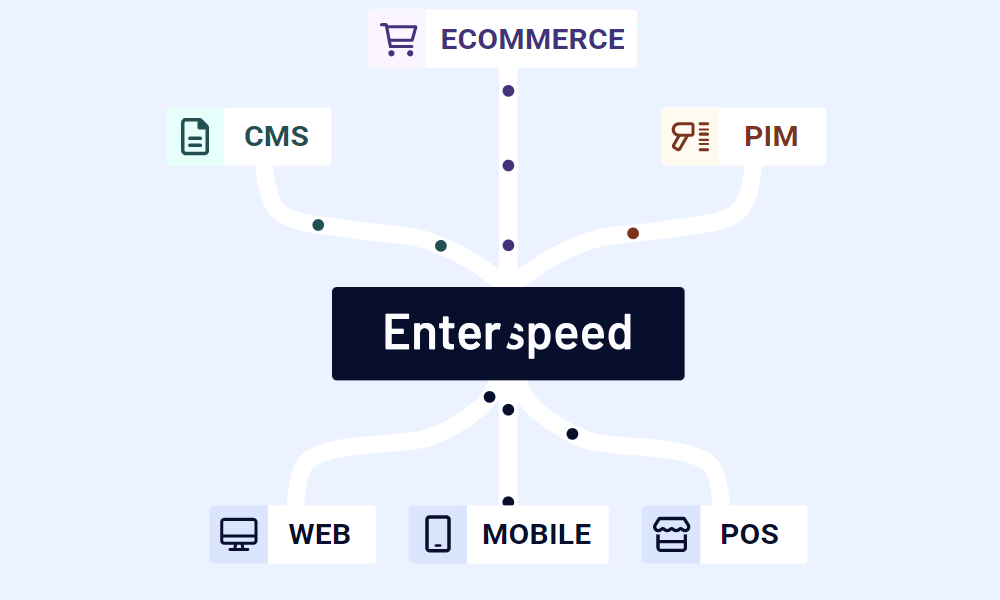
So let’s see how an Enterspeed setup could solve the bottlenecks we looked at above.
For server placement, Enterspeed provides multi-region support globally. Additionally, our entire solution is built on Azure cloud services, which automatically handle scaling and traffic distribution.
All query complexity and data fragmentation are removed since we combine the user’s data into static views, which automatically regenerate as soon as the data updates.
If speed is what to know about, perhaps you're also interested in speeding up B2B pricing on your website :)

That concludes today’s sales pitch. Now let’s actually try to build the middleware that fetches from the Enterspeed API. In this example, we will be using Next.js and Netlify.
However, maybe you also want to know why we think that the perfect middle layer is the one you don’t notice. Go ahead :)
To utilise the full power of our middleware, we will use Netlify’s Next.js Runtime, which allows us to rewrite and transform content at the edge.
Another one of its insanely powerful features is its ability to transform page props on the fly, which we will use in the examples below.
To get started, make sure you have the latest version of the Netlify CLI (and a Netlify account). The Netlify CLI allows us to use edge logic for custom headers and redirects, environment variables, and Netlify Functions on our local machine.
Next, spin up a new Next.js project and install the @netlify/next package, which allows us to use Netlify’s edge functions in our middleware.
Create a middleware.js (or .ts) file and place it in your root/src directory (same level as your pages folder). The file will run on every request, including static files, pages, assets, etc.
💡 The example below is based on the brilliant article “Rewrite HTML and transform page props in Next.js with Next.js Advanced Middleware” by Salma Alam-Naylor. Check it out for a more in-depth tutorial of how the Next.js Advanced Middleware on Netlify works.
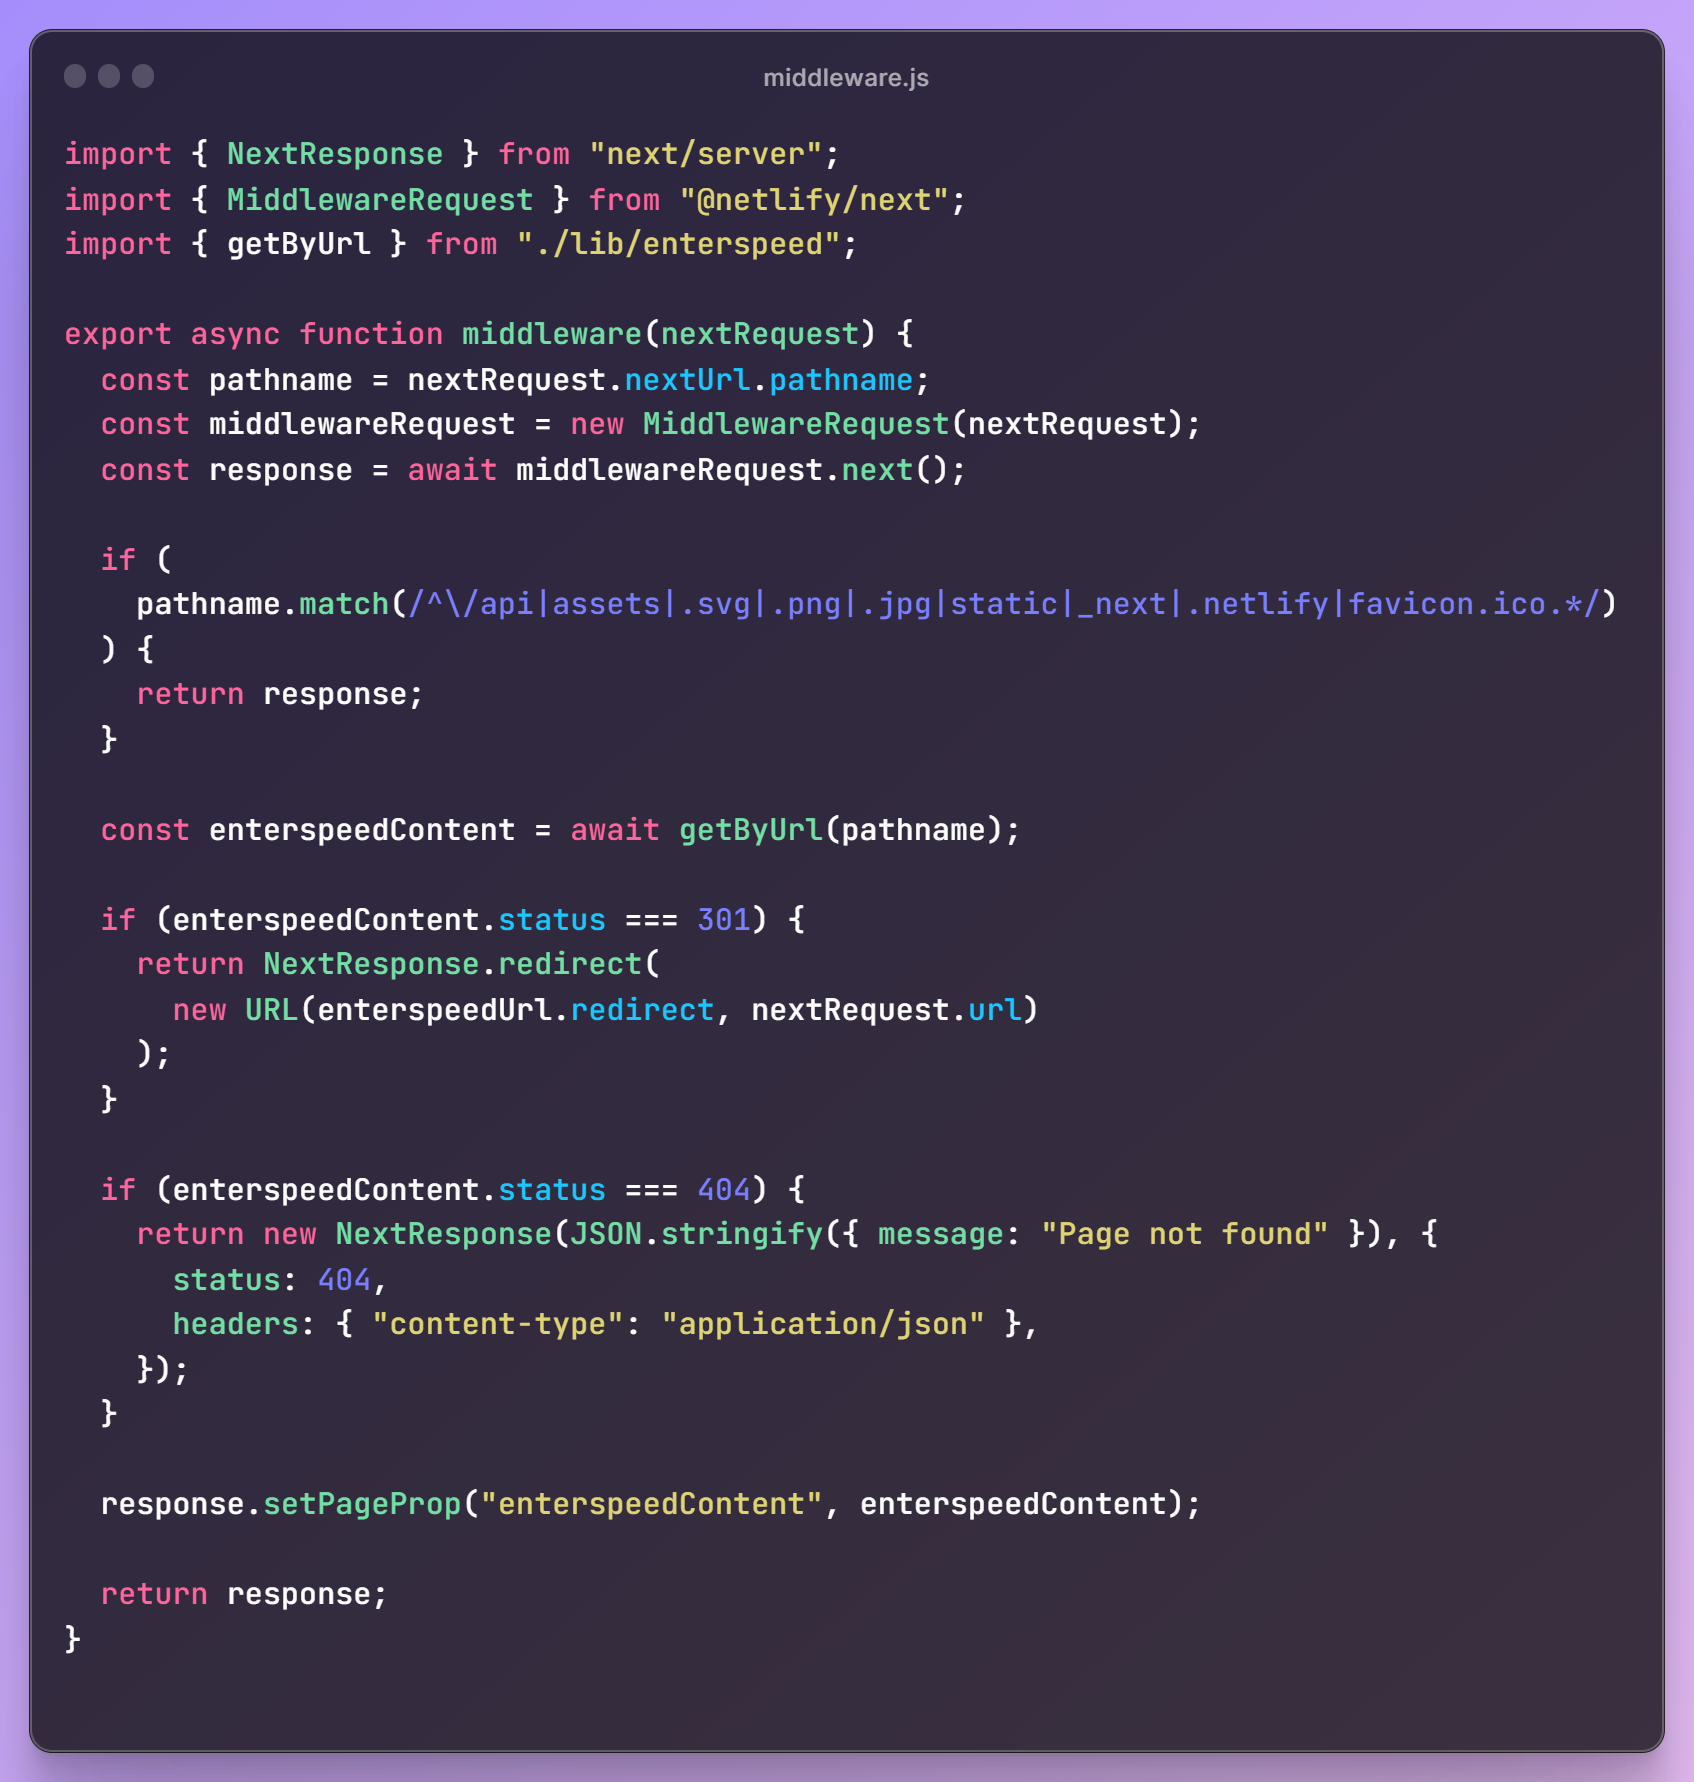
Export an async function named middleware and pass in the request as nextRequest to the function.
Import { NextResponse} from “next/server” and { MiddlewareRequest } from “@netlify/next”.
Next, declare the following constants:
Next, since the file runs on every request, we check to see if the pathname matches some of our unwanted resources. If it does, we simply move on to the next response in the HTTP chain by returning response.
💡 This can also be done using matcher in the config object. However, there seemed to be some problems with this and the Netlify middleware in this case.
Afterwards, we get the actual content from Enterspeed using our Delivery API. We have made a helper function called getByUrl, which simply fetches from the API using the URL as the query parameter.
The data we’re getting back from Enterspeed is based on the schema we have designed. The data also includes a status (200, 301, 404, etc.) and a redirect property, which can include the path to where the content has been moved.
If we receive status 301, we redirect to the URL provided in the redirect property. If we receive status 404, we throw a 404 response.
However, if all goes well, we pass the data from Enterspeed using response.SetPageProp, which makes the data available as props in our pages, and afterwards return the response.
💡 To keep the example simple, we simply look at these three status codes. For real-world applications, you should handle all possible exceptions.
Now, we can create a page using dynamic routes to handle the content we get. For this simple example, we have created a simple article that returns a few properties. The properties we get are:
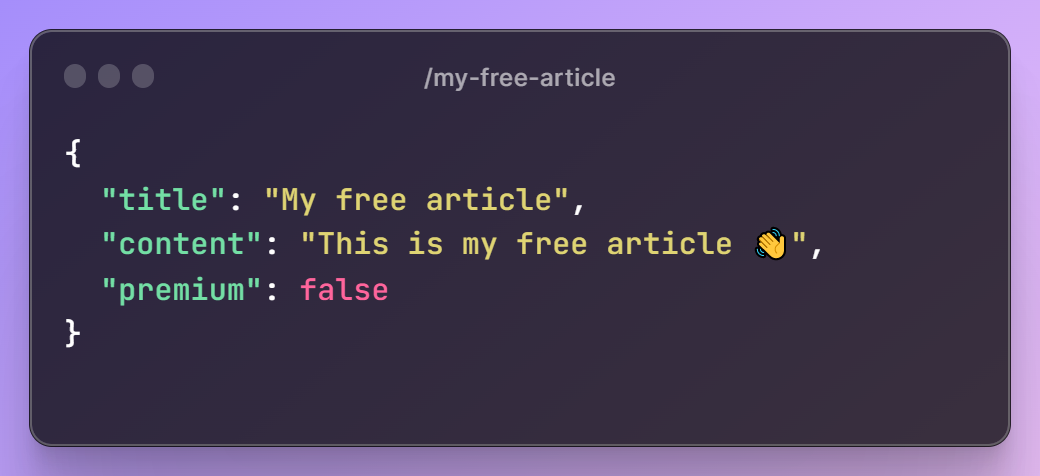
Now you’re probably thinking, what’s with the “premium” boolean? Glad you asked!

Say we have paywalled content, which requires a subscription to read. We then need to check to see if the user has an account before they can access it. This can be done using JWT (JSON Web Token).
By implementing authentication in the middleware, we’re able to authenticate users before they hit any endpoints – we can even do it right at the edge. You can check out Vercels JWT Authentication template right here.
Once authentication has been added, we can make a simple function checking if they’re signed in and if the premium property is true.
If they’re not signed in and the premium property is true, the user will be redirected to the login page.

💡 As previously mentioned, we can store data like the user role in the token, which can be implemented in the logic above.
Interesting, but what if we still want the user to be able to access a page but not view all of its information? For instance, a B2B website that only shows prices to its current customers.
The data could look something like this, where we want to hide the price.
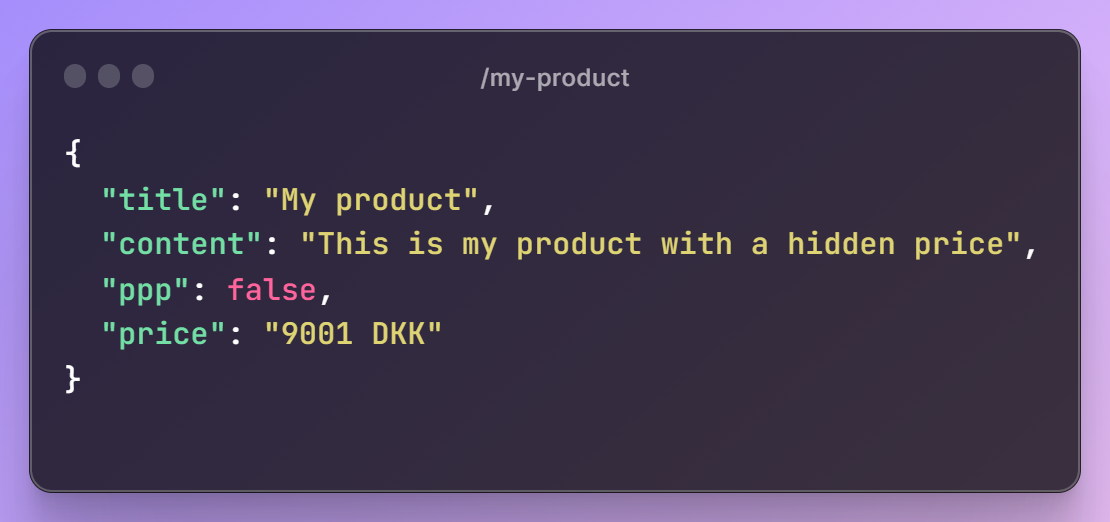
Then we simply change the price property before setting the page props. We can either delete it or change its value, like in the example below.
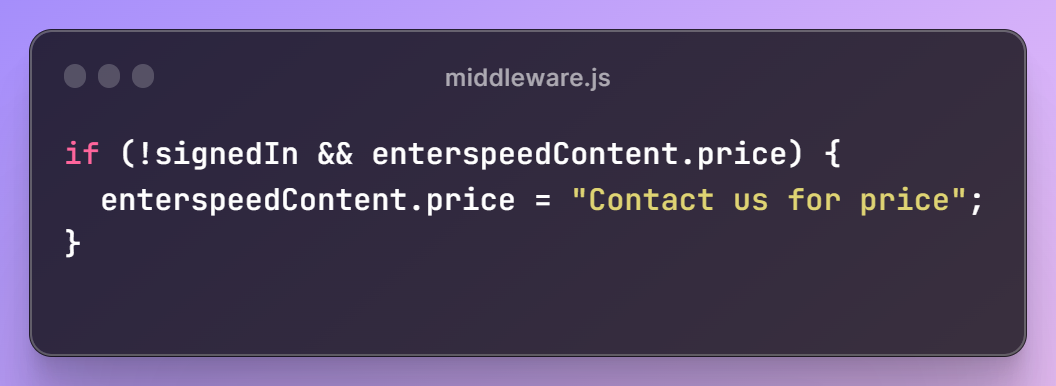
Ah, you spotted it, didn’t you? Once again, you sit with a puzzled look on your face thinking, “What the dickens is the ppp-property?”
…And just like a hungry salmon swimming in the crystal-clear river, you took my bait 🎣
Poor naming convention aside, let’s look at how we can transform prices based on geolocation.
But why change prices based on geolocation? The answer is Purchasing Power Parity (PPP) strategy.
Purchasing Power Parity is a pricing strategy where companies set product prices based on local market conditions and production costs in different countries, using PPP exchange rates to ensure price consistency and stability.
The data could look something like this.
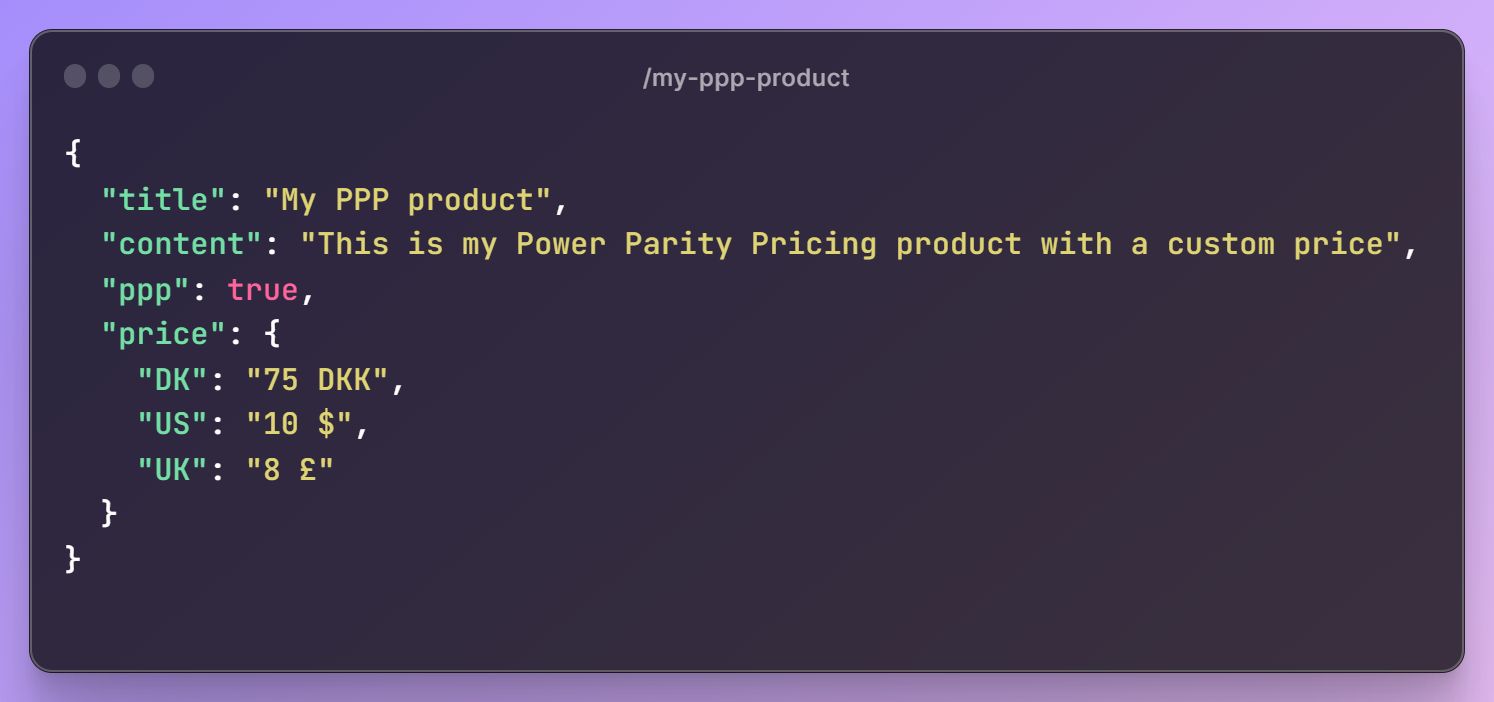
Here we have different prices for “DK” (Denmark), “US” (United States), and “UK” (United Kingdom).
In our middleware, we have access to the visitor’s geodata via the nextRequest.

We can then change our price, depending on the visitor’s country, with some simple logic. First, we check to see if the ppp-property is true, and then we change it to the price for the specific country.
If we don’t have a price for the user’s country, we use “US” as a fallback.

How cool is that!
You may be sitting in your chair, fingers stretched, screaming, “UNLIMITED POWER!” to the thoughts of all the possibilities of middleware.

That’s great! The purpose of this article was to show you how you can utilise middleware for your application in a performance-friendly way using Enterspeed.
You can view other use cases for middleware in Vercels template library.
The question is then, should you use middleware? To quote every software developer on the planet:
“…It depends”.
There are a thousand ways to skin a cat. What makes sense for your setup may not make sense for others.
Simply fetching data and manipulating props can also be done using getServerSideProps, the same goes for checking authentication.
However, what middleware can do, in this case, edge middleware, is to personalise content with very low latency since it’s running on the edge.
Moreover, because the middleware runs before the cache, it can manipulate statically generated content.

Loves optimizing and UX. Proud father of two boys and a girl. Scared of exercise and fond of beer.
© 2020 - 2026 Enterspeed A/S. All rights reserved.
Made with ❤️ and ☕ in Denmark.