Sprout endless sites from a single Next.js and Umbraco instance




Has building ordinary, single websites become monotonous for you? Do you need to let loose and just try something new for a bit? Well, you're in luck, we've got just the thing to spice up your developer life.
In this article, we will show you how to build multiple different websites using just a single Umbraco instance as the CMS and a single Next.js as the frontend. And to get that sweet, sweet performance, we're also going to use Enterspeed as a middle layer to serve our content blazingly fast.

Some of you might sit with a puzzled look on your face, thinking: "Why on earth would one do that? Is this merely an insane idea like using Google Sheets as your CMS?".
Even though I'll admit that we love to push the envelope here at Enterspeed and try out crazy things, there are actually several use cases for this scenario. One of these scenarios is microsites. Microsites can, if used correctly, be an extremely powerful marketing strategy for your business.
Pssst... Don't care about marketing and strategy but simply want the geeky stuff? 🤓 Then you can safely skip the section below.
First of all, what the dickens is a microsite?
A microsite is a small website that exists separate from the primary website, often on its own domain or subdomain. Unlike the primary website, it often has just a single goal, for instance, to promote a single product, service, or event.
Even though they share similarities, a microsite is not a landing page since a landing page is just a single page. A landing page is also focused mainly on hard conversions, whereas a microsite focus can be more about an experience, which can help to assist conversions later down the road.
Let's look at a few examples.
Say we are a business that owns several sub-brands or product lines. Each of these brands/products may have its own unique design and may also be targeting different demographics. This could for instance be a brewery selling both alcoholic and non-alcoholic beers.
Having a unique microsite, where they can fully control the visual identity and the communication, would not only make the message more powerful – it would also help with ad relevance when driving paid traffic to it.
Another similar example could be a brand with a single product that targets different demographics – this could be a nutrient supplement.
The target groups for this nutrient supplement could be:
Just to name a few. How you market a product to these three groups differs highly – both in communication and design.
A third example could be a product or a service with an extremely long and complicated buyer's journey – for instance prefabricated houses.
The time it takes for a family looking for a house to go from idea (top-funnel) to actual purchase (bottom-funnel) can be literal years.
This whole sales funnel can contain hundreds of touchpoints and consist of several questions like:
Having strategic microsites, which assist along the whole buyer's journey can be their bytes worth in gold.
Last example, before jumping into the nitty-gritty details. Say you are a pest control company. You want to increase your organic presence in the search engines to gain more customers and reduce your reliance on SEM (paid advertisement in search engines).
A strategy here could be to build a microsite for each type of house pest, e.g. flies, bed bugs, wasps, rats, termites, etc.
Each of these sites will be highly relevant for this specific topic – and can be easier to build links to (some website owners prefer to link to a topic website instead of a company website).
Phew, that was a lot of marketing talk. To quote Linus Torvalds: “Talk is cheap. Show me the code.”
This example will be built around our fictional company – Enterbrew 🍺.
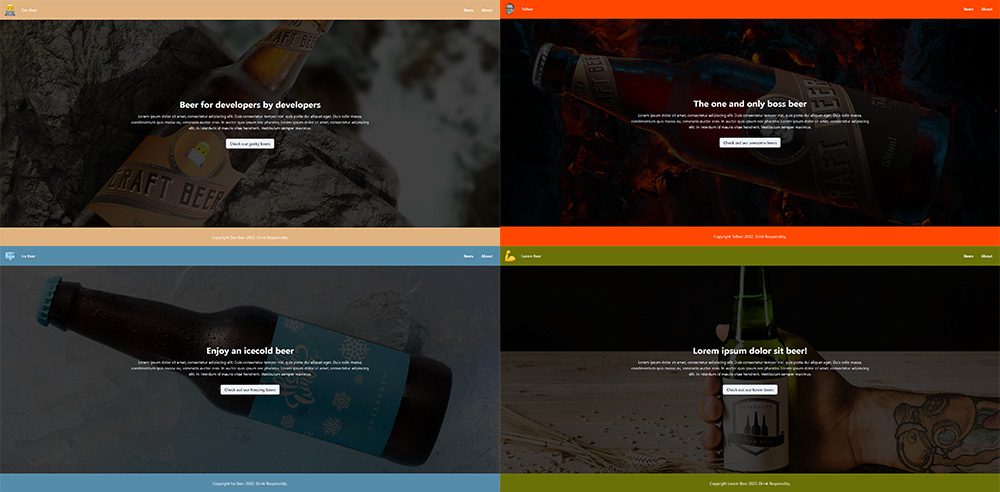
Enterbrew is a brewery consisting of 4 subbrands targeting different demographics.
Each of these microsites will have a homepage, a page listing the different beers, individual product pages for each beer, and finally an about page.
However, even though we're going to run all of this from the same backend and the same frontend, we're not limited to this structure. If we wanted, we could use different page types for each page.
Let's start by setting up a Umbraco instance.
Start by downloading and installing Umbraco, e.g. on your local machine (You can also use Umbraco Cloud if you prefer).
Afterward, go to the Umbraco Backoffice, click on Settings select Document Types. In this example we're using 4 document types:
We're not going to go over all the properties of each template, since they can be whatever you want. The important thing is that you set one of your document types, in our example, Home, as your root node. This is done under Permissions in the template, where you set the Allow as root to true.
Next, go to Content and create a new item with the root node type, in our example, Home, you just created. Once it's been created, right-click on it and choose Culture and Hostnames. Add the domain you wish to use for this site, e.g. https://www.devbeer.com.
Repeat the step above for all the sites you wish to create.
Now it's time to set up the Enterspeed integration. Once we've connected our Umbraco site with our Enterspeed account, all of our content will be automatically synced to Enterspeed providing us with a blazing-fast speed layer, and essentially decoupling our Umbraco instance.
You can also see our use case about the benefits to a Blazingly Fast Frontend.
But before we start blasting content into Enterspeed, we first need to create a data source inside Enterspeed, which provides us with an API key.

Go to Enterspeed, click on Settings and select Data sources. Click Create Group and give your group a name and a type. Next, add a data source (our Umbraco instance) and select an environment, e.g. Development. Click Add and then click Create.
Pssst... If you don't have an account already, you can create one right here 👉 https://app.enterspeed.com/signup (no credit card required).
Awesome, now we got an API key. Let's head back to our Umbraco instance.
Start by adding the Enterspeed integration via NuGet. We currently have integrations for versions V7, V8, and V9.
Once you have installed the integration, you'll see a new tab under Settings called Enterspeed Settings. Add https://api.enterspeed.com as the Enterspeed endpoint and the API key you just created under API key.
Test your connection and click Save configuration if everything goes well.
All content will now be synced to your Enterspeed account when you save and publish. If you need to seed already published content then click on Content and select the Enterspeed Content tab. Choose Seed and click on the Seed-button.
Excellent – now it's time to set up Enterspeed.
If you're the type to prefer video, perhaps you want to check out this one on how to ingest Umbraco data in three minutes.
Verify that all your content has been synced, by going to Source entities under Home. Choose your data source and check if all your content is present. Furthermore, confirm that the domain you entered under Culture and Hostnames in Umbraco matches the one in the URL column.
If everything is good, then it's time to create our first schemas. So first, what is a schema, and why do we need them?
One of the powerful things about Enterspeed is our ability to transform and model content into exactly the views you need. This is done by creating schemas.
Schemas make it easy to combine multiple data sources, and to make deeply nested properties more accessible.
For our example, we will create a schema for each document type we created in Umbraco, and two for the navigation (one for single navigation items and one containing all the navigation items).
Once we have created and deployed the schemas, a view will be generated for each source entity that matches the schemas trigger.
💡 A trigger defines what you want the schema to "trigger on". It consists of a source group (your data source) and contains an array of one or more soure entity types (types of content).
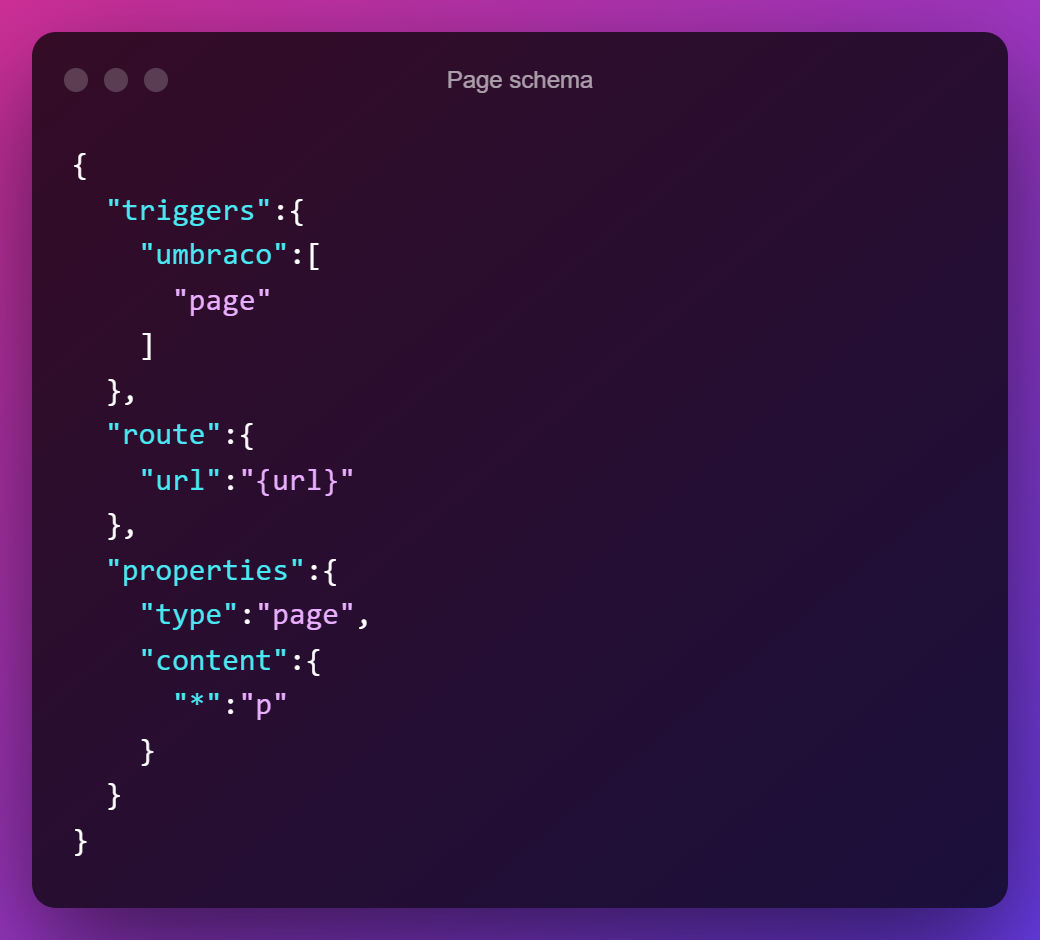
In the trigger property, we first define the source group (here our Umbraco data source group), and next the source entity types (e.g. our page types).
Furthermore, we also need to define how we want to access these generated views when called from the front end. Here we have two options: Handle and URL.
All the schemas that are based on document types from Umbraco reflect an actual page, therefore we will use the URL route option.
The navigation on the other hand is an entity that will be used across the entire app, therefore we will use the Handle route option.
Let's take a look at each schema.
Beer-schema
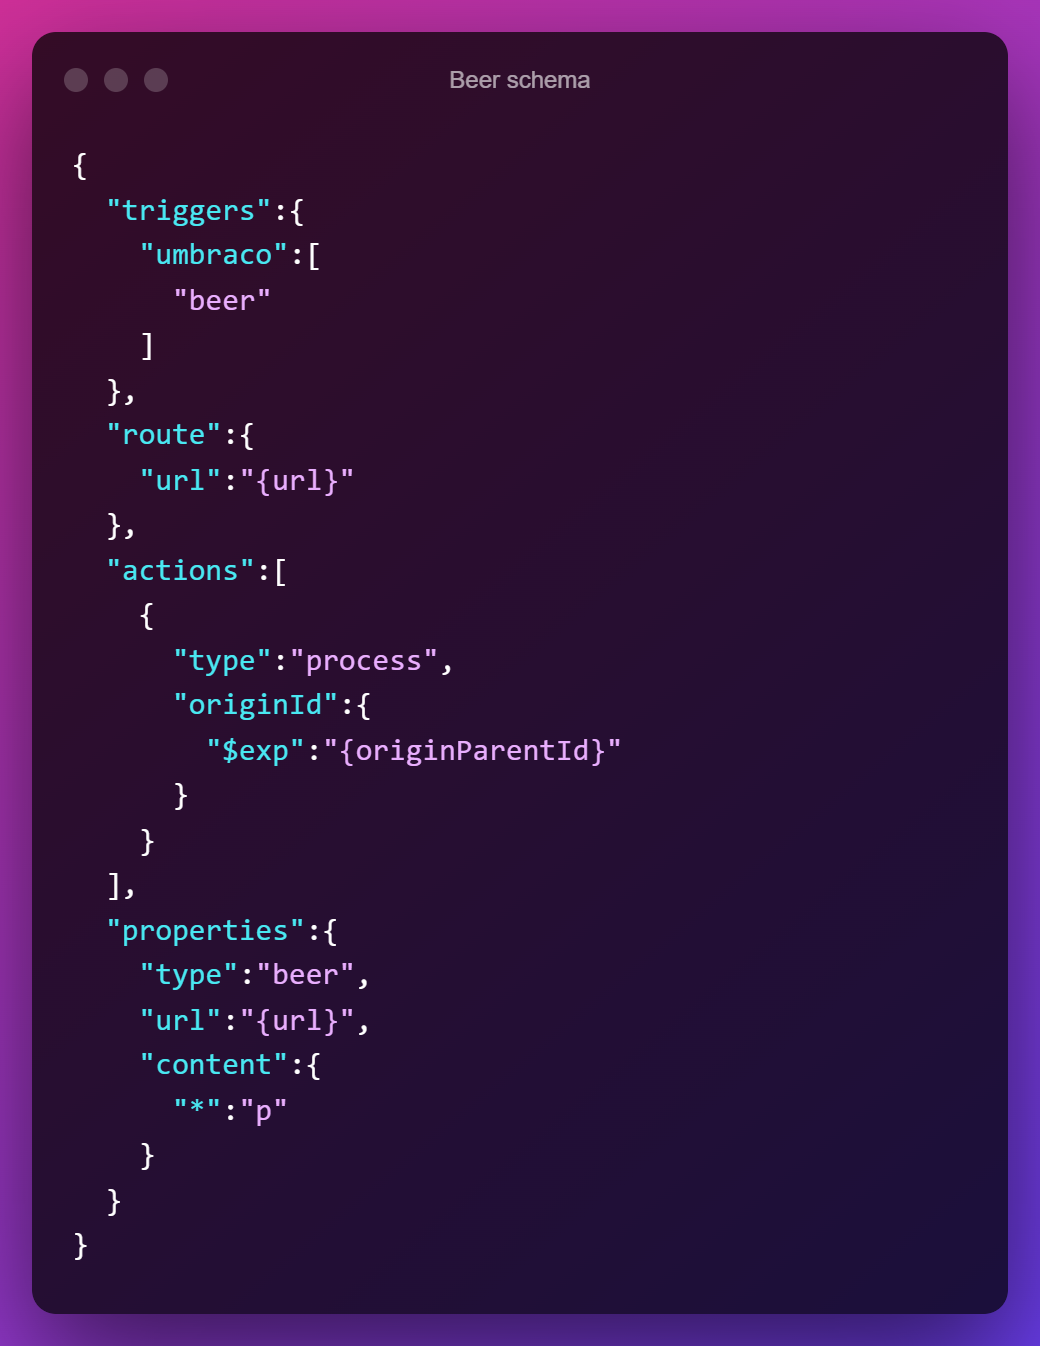
This schema gets its content from the Beer source entity type and is routable via URL. The URL value will reflect the one in the source entity, which is identical to the page URL in Umbraco.
We have also set up some actions. The actions here will trigger a process of another schema. Since our Beer is a child of Beers, which will show a list of all its children (Beer), we need a way to update the view whenever its children (Beer) change. This is done via the action type process.
In the process action, we also need to provide an originId, which is the ID of the source entity given upon ingest (In Umbraco it reflects the page ID). We want this originId to be the same as our current source entities' (Beer) originParentId (also given upon ingest, here reflects the page's parent - Beers).
So to sum up actions. Every time one of our Beer views changes, it triggers a processing of its parent, here the Beers view.
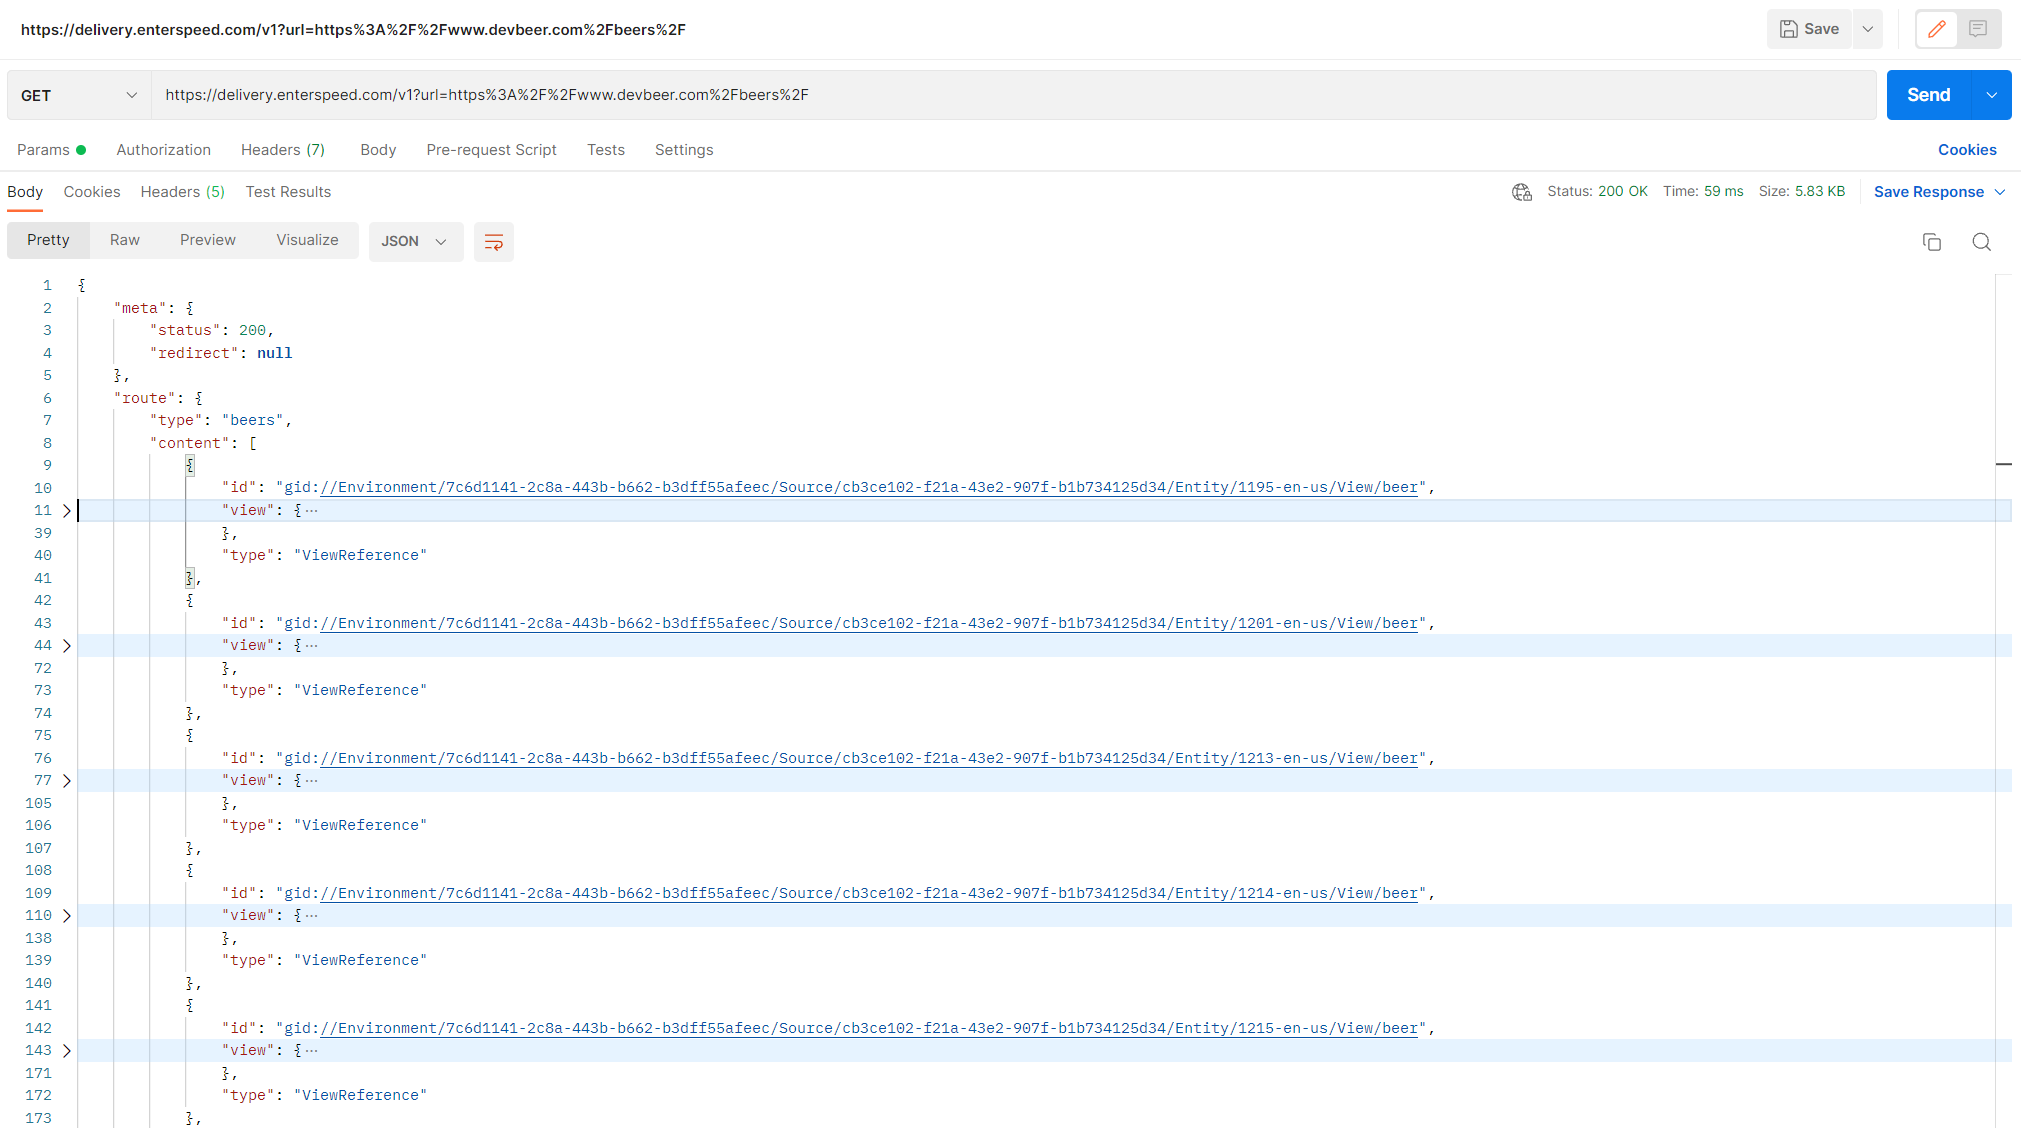
Below we have properties, which is the actual content. Here we define a type, that we will use for rendering logic in our frontend and the URL to the page, which we will use to link to the individual beers on the overview page. Last, but not least, we grab all the content we have from Umbraco for this page, by using dynamic mapping. We group all of this under content and map it all out by using: "*": "p"
Beers-schema
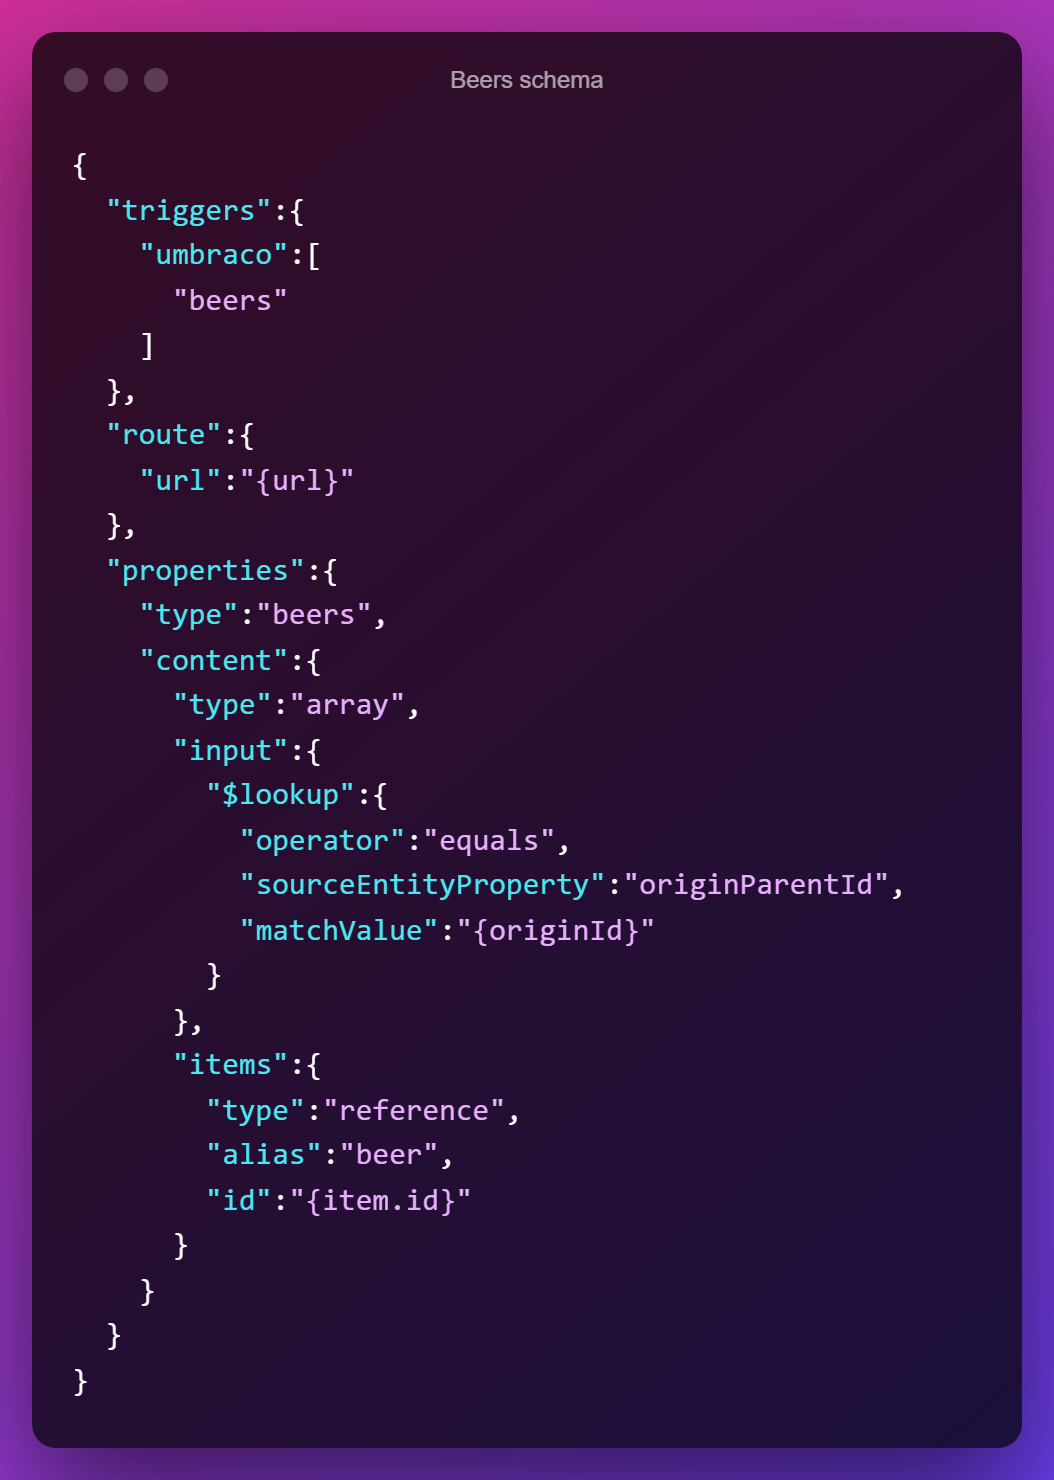
Just like the schema above, we have defined triggers, set route to URL, and specified beers as the type under properties.
Under content, there's suddenly a lot going on, and even though it might seem complex at first, it's actually quite simple when we go through it step by step.
Where we before had been working mapping out strings, we now want to output an array. So let's look at the structure.
First, we define the type as an array. The reason why you don't have to do this on strings is simply syntactic sugar since strings are the most commonly used property type.
Next is the input property. This is where you wish to retrieve the collection from. We use the $lookup type to define a query-like criteria that the source entities have to match.
The operator we want is the equal operator and the sourceEntityProperty we want to look at is originParentId. This should matchValue of originId (which here is the Beers originId).
So in other words. We want to source entities that have Beers originId as their OriginParentId. All the children of Beers.
Cool. Now the last part – the content. The items field is used to map the results.
The type we are using here is a reference type, which is used to reference another schema – in this case the Beer schema we created before. We reference another schema using the schemas' alias – which happens to also be beer.
Lastly, we need to specify the ID of the source entity, which is found under id, and since we're looking for it "inside" one of the items, we prepend it with item, which then becomes: item.id
And voilà. We now have an array of all our beers 🍻
Home-schema
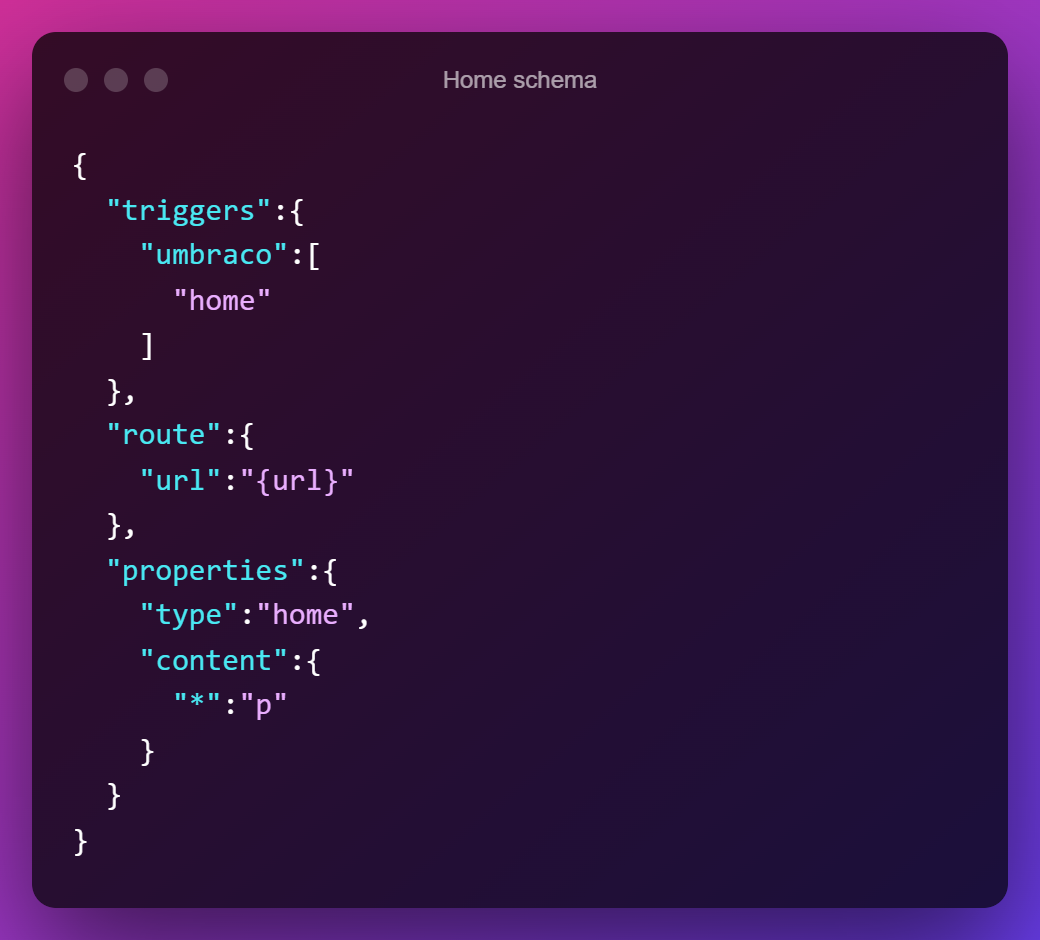
And now to relax with a simple schema. We grab the home source entity type, make it routable via URL, set the type to home, and dynamically map all the content under content.
Page-schema

This schema is structured the same way as the Home-schema.
Navigation item-schema
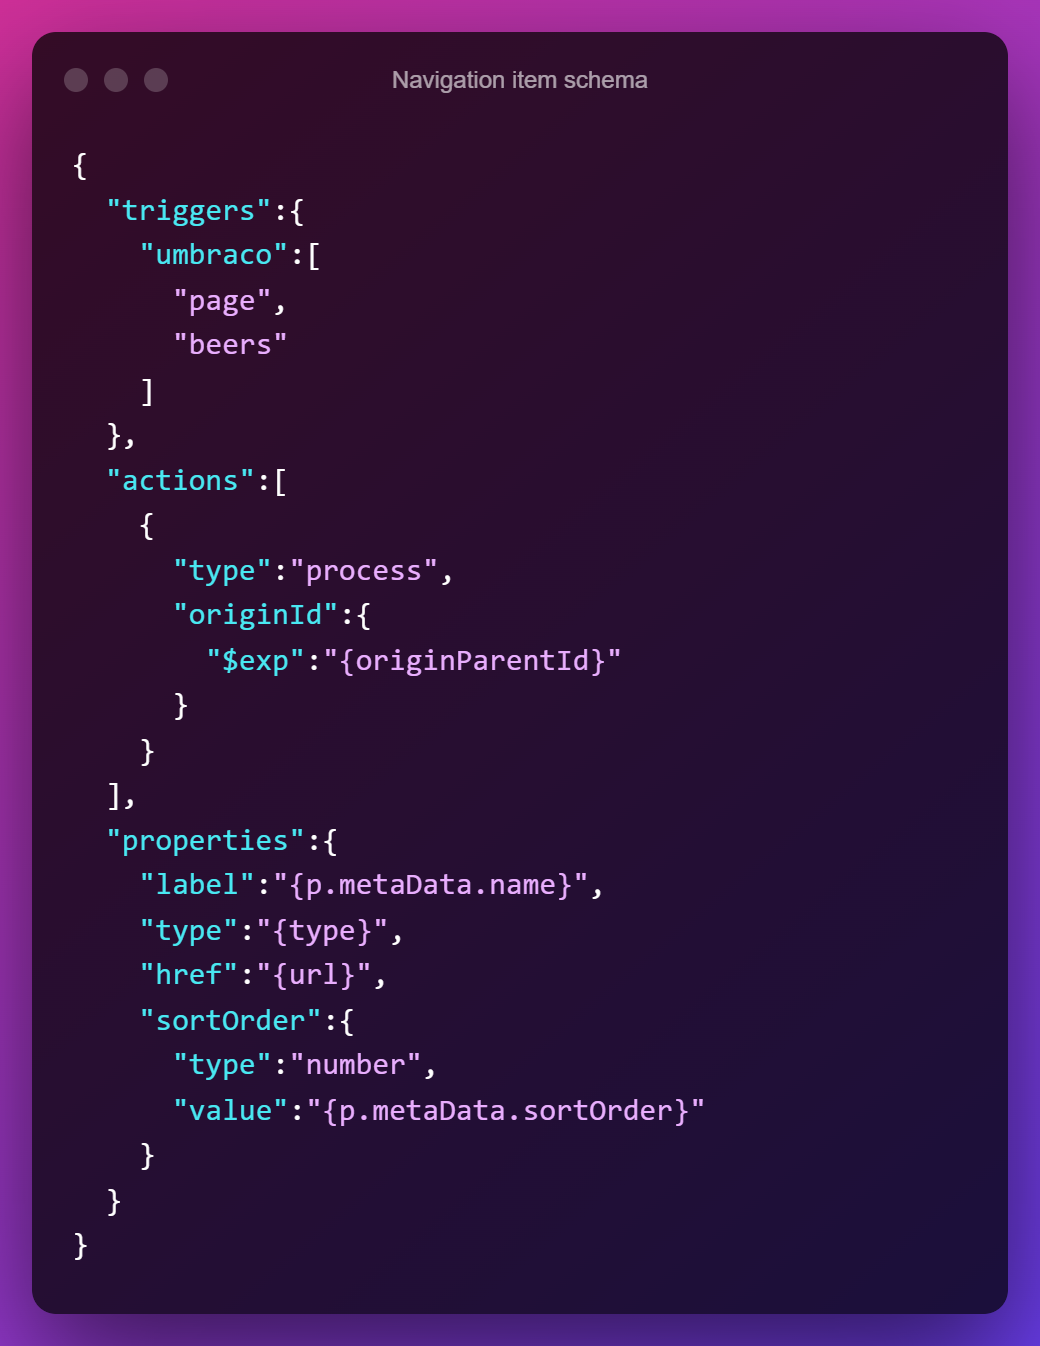
Now it's time to create our individual navigation items. First, we define which source entity types we want the navigation to consist of. In our example, we just want a very simple navigation, consisting of only parent pages (meaning not the individual beers). We also don't want it to include our homepage since we will use the logo for navigating back to it.
Unlike our previous schemas, we don't include a route, since this schema only will work as part of our navigation schema, and never will be called from the front end.
Under actions, we do the same as we did in the Beer schema. We tell it to process its parent whenever something new happens to views with source entity type page or beers. The parent in this case the site node, home.
For properties, we grab the metaData.name for the label, the type we have given our other schemas, and the url for href. From Umbraco, we also get a sortOrder, which we can use to sort our navigation in the front end.
Navigation schema
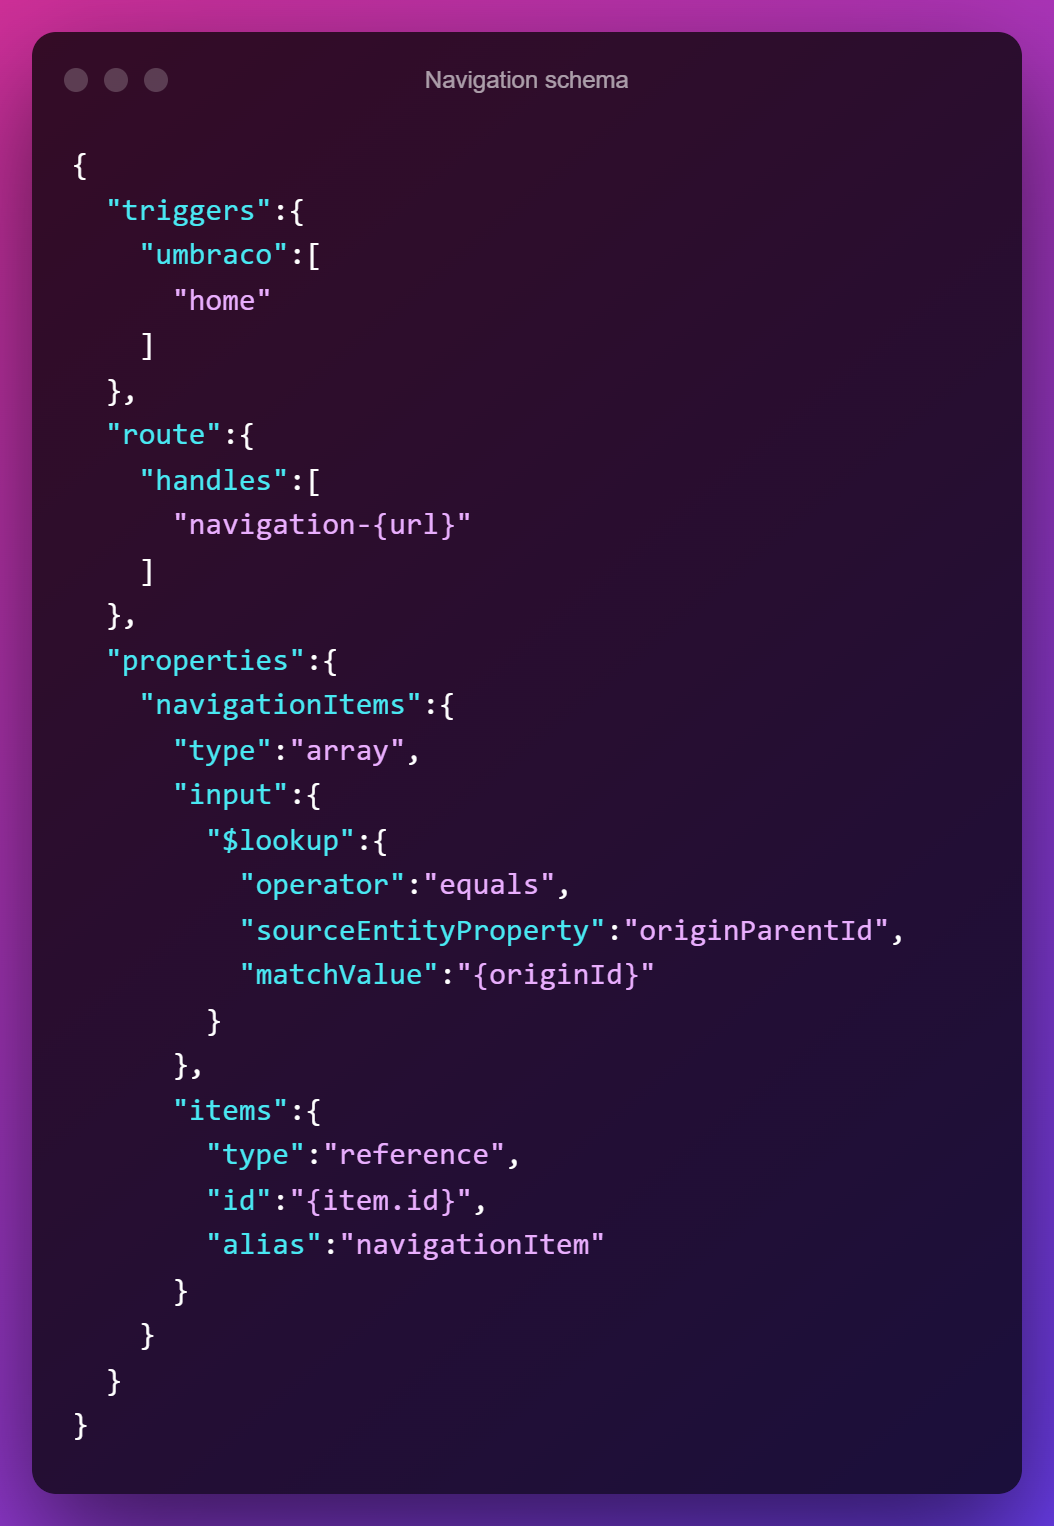
Just like a decorative oriental rug, it's time to tie it all together. We use our root node, home, as our source entity type.
In route, we will use handles, since the navigation is a component that will be fetched throughout the website, and not just a page.
However, since we're building a multi-site solution, we need a way to differentiate the navigation for each site from the other. We do this by appending the handle, navigation, with -{url}, which inserts the URL for home, which is the root URL.
Inside properties, we create an array that, just like our Beers schema, uses a reference to another schema, here navigationItem.
That was the last schema we needed to create. Now we just need to deploy our schemas so our brand new views can be generated.
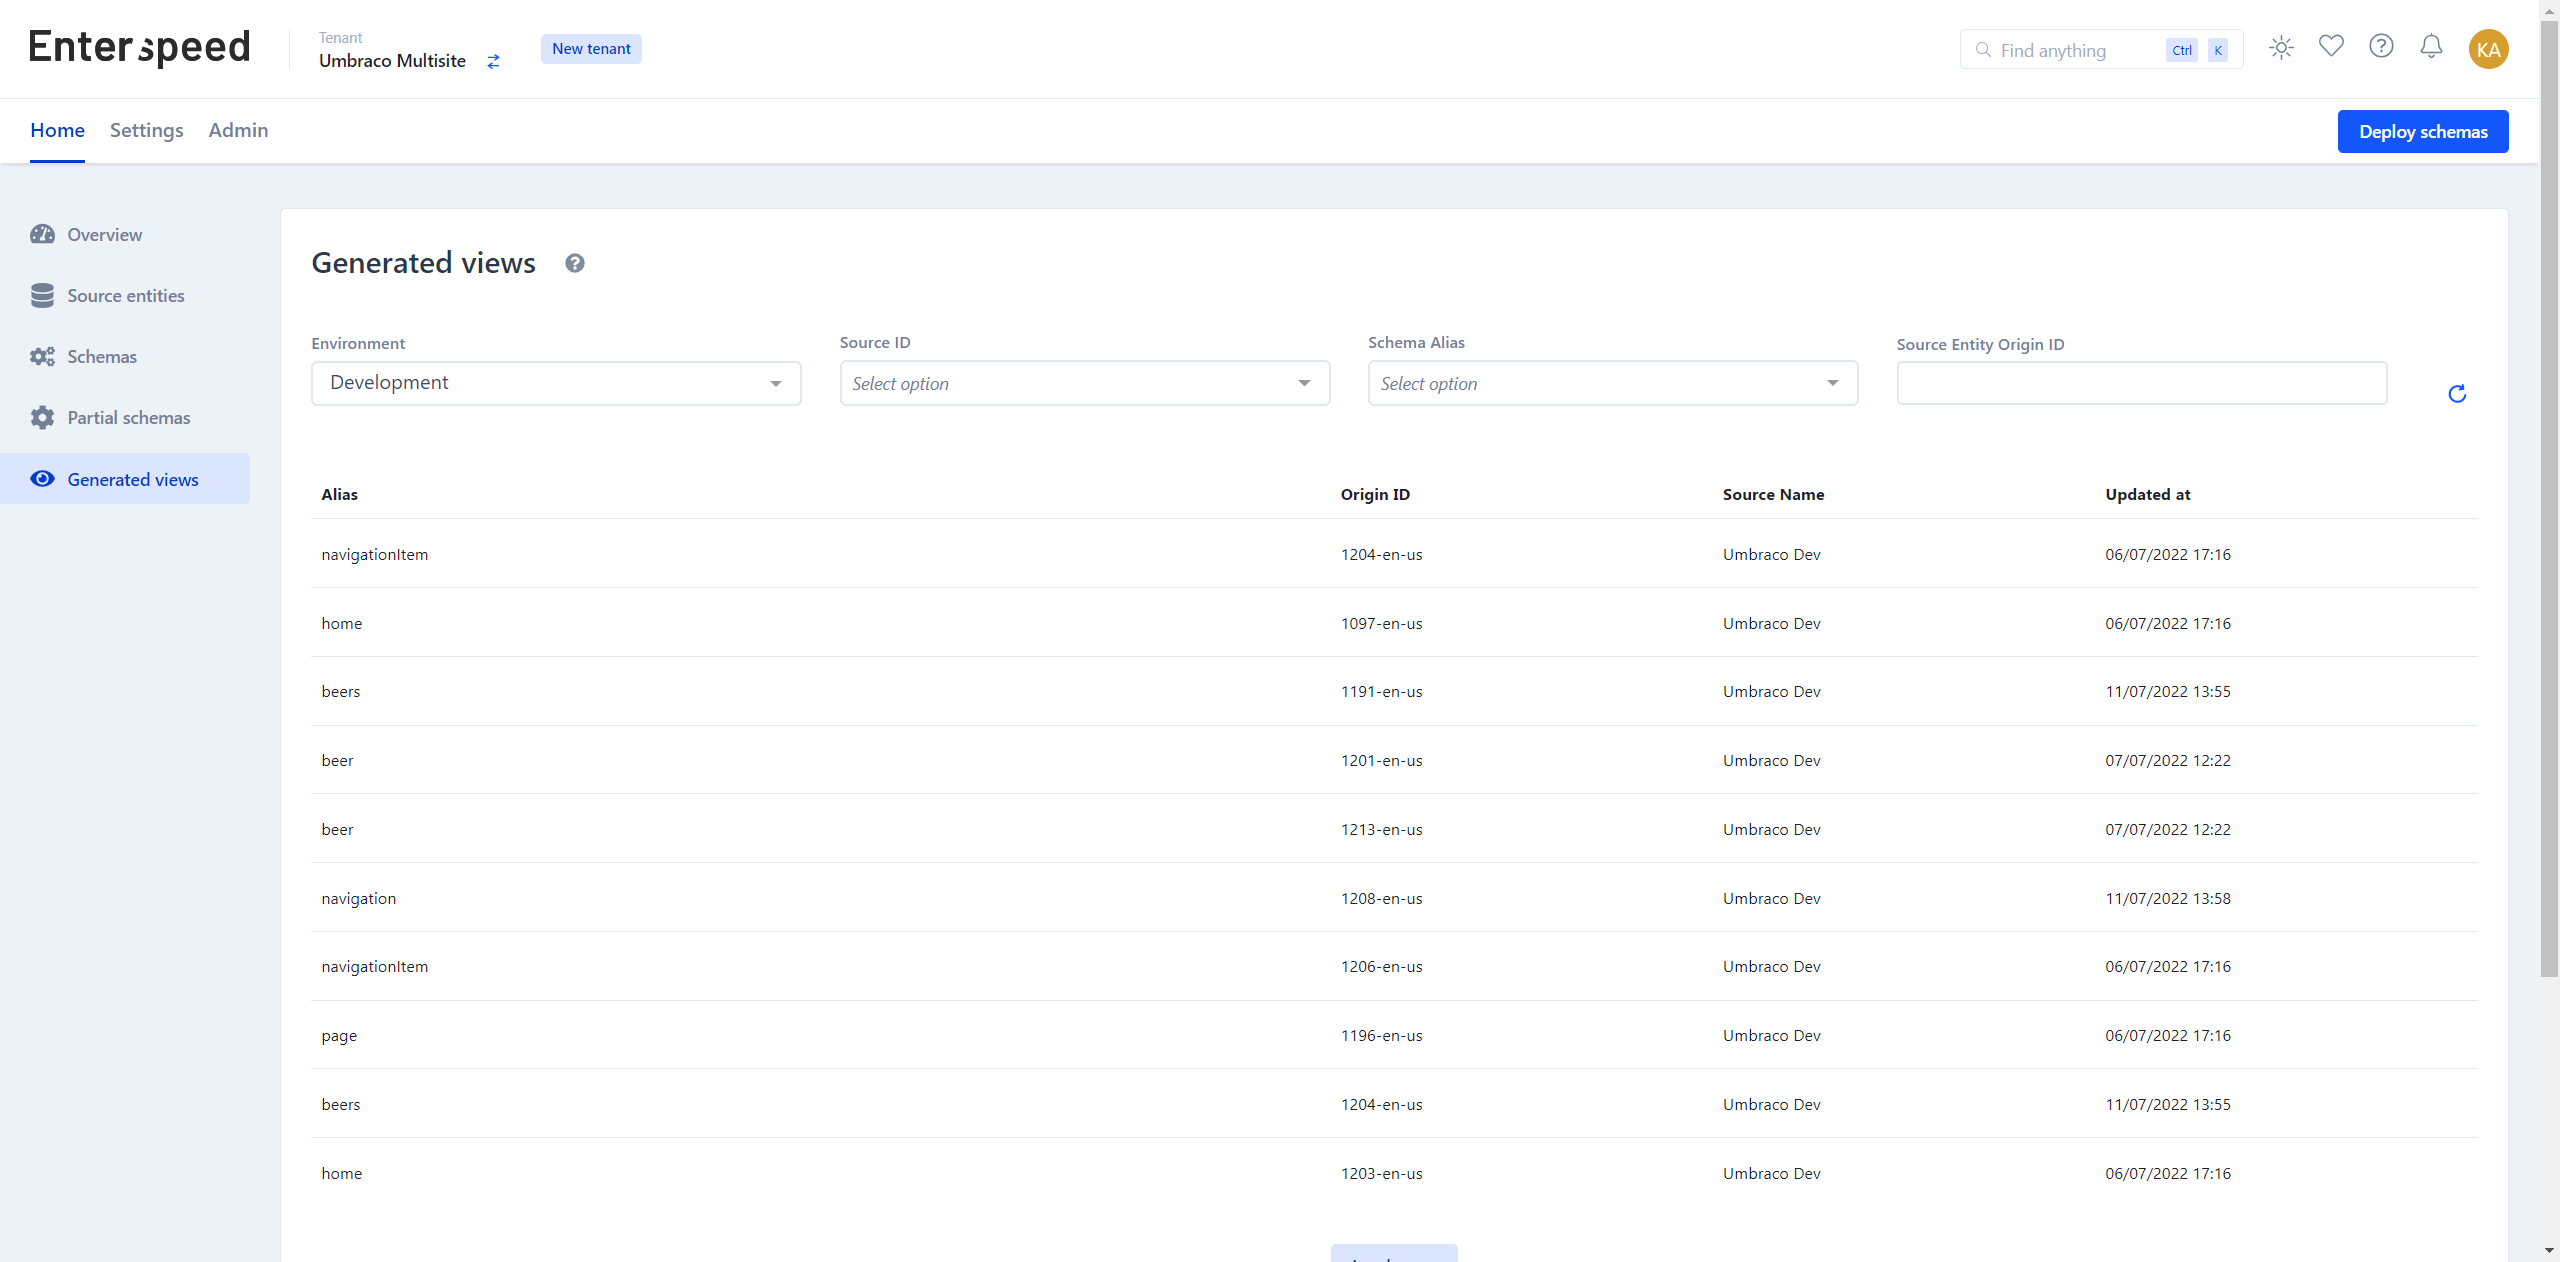
Once you have deployed the schemas, you can navigate to Generated views under Home to see the result.
Creating environment client(s)
The last thing we need to do is to create one or more environment clients.
"Well, what is it, one or more?" you ask.

Normally you have one environment client per website and, as the same suggests, per environment.
However, we are building a multisite based on a single Next.js instant, which makes it a little different.
If you want to use Enterspeeds Routes API, for instance, to build a sitemap, then you need individual environment clients. If not, then you can do it with just a single environment client. So, the choice is yours.
Don't worry, we will show you how you can support multiple environment clients later on.
To create an environment client, go to Settings and select Environment settings.
If you have done everything correctly, then you should already see a list in the Domains section of all the domains you have entered in Umbraco under Culture and Hostnames. If not, then you need to manually create them and their hostnames. But for now, let's assume you've done everything correctly – WELL DONE 🎉

Go to Environment clients and click Create. Give your environment client a name and choose an environment. Then click Create. Next, choose all the domains you want to attach to this environment client. If you're planning on only using one, then select them all.
Note: If you add more sites in the future, you need to go to edit the environment client and add these domains.
Now that we're ready to move on to the front end – our Next.js instance. Here we will also meet a very famous, red crustacean, which unfortunately is not Zoidberg.

Now it's time to set up our front end. For this, we're going to use Next.js, Express, and the secret sauce which makes it possible to use just a single Next.js instance, Krabs.
What is Krabs? The author describes it as: "...an enterprise-ready Express.js/Fastify middleware for serving thousands of different websites from a single Next.js instance."
Pretty freaking cool – and with an awesome name nonetheless.

Shout out to Michele Riva for this awesome package 👏
Note: Krabs forces you to use a custom server. Therefore, deployments to Vercel are not supported. Krabs is also only supporting SSR at the moment, and not SSG nor ISR.
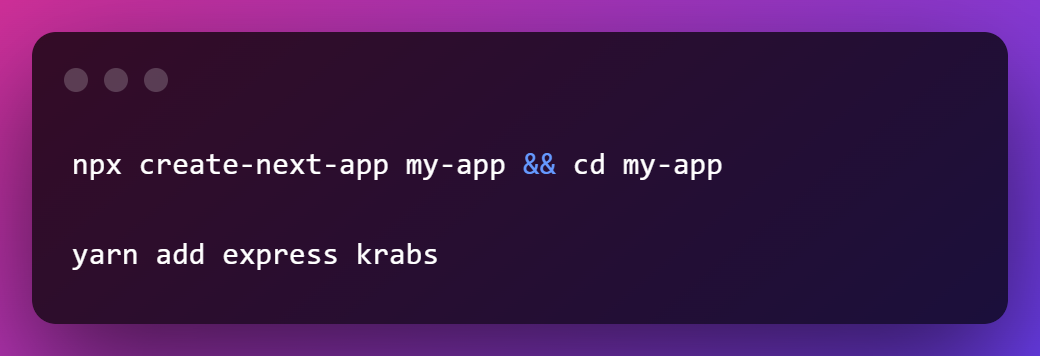
First things first – start by creating your Next app. Next, install Krabs and Express.
If you like Next.js too, maybe you want to know how to enable preview mode in your Next.js application.
Note: The steps for the Krabs configuration are borrowed from their documentation.
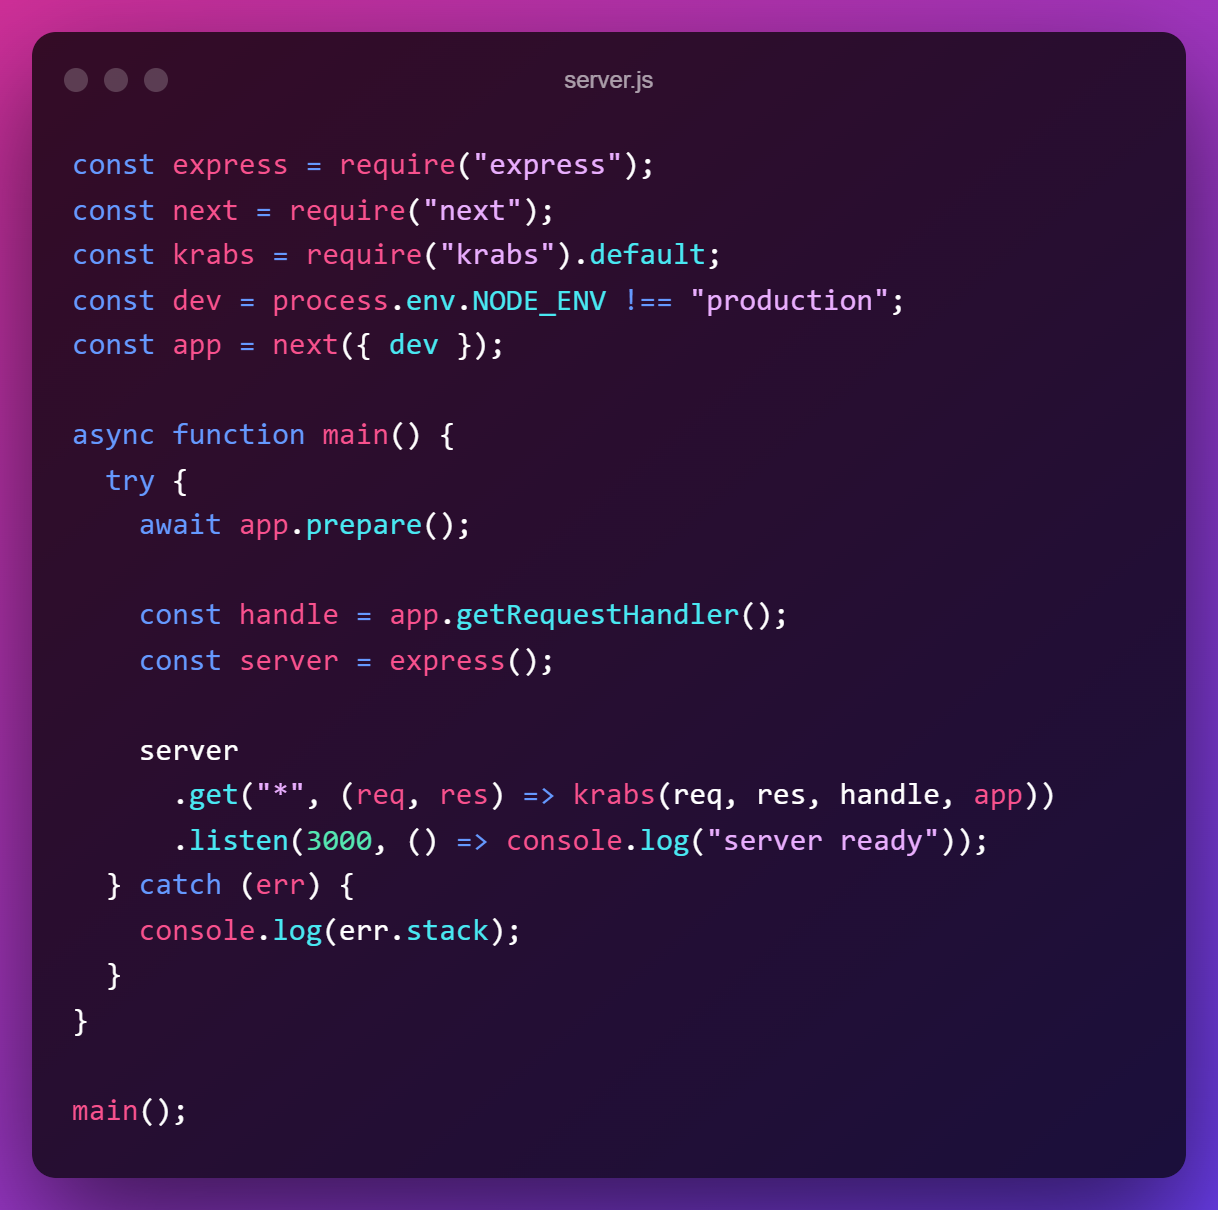
Create a new file called server.js. This will be the entry point for our custom Express.js server, which handles our Next.js instance.
Next, create a file called .krabs.js (or .krabs.config.js) inside your project's root folder. Krabs will automatically import the configuration from this file.
We have extended the standard configuration by also adding a property called enterspeedDomain. The value for the enterspeedDomain should be the same as the one given in Enterspeed (and Umbraco).
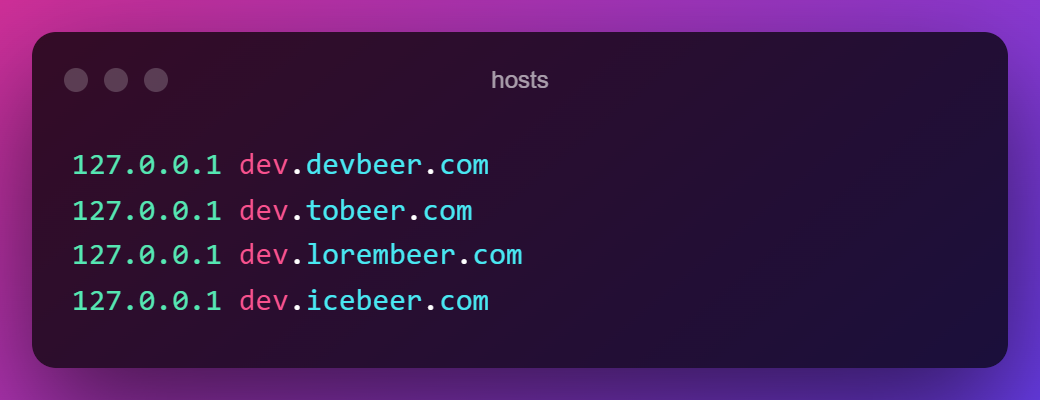
To actually see what we're doing, we need to configure our hosts file. Insert all the domain names you want to view in your local environment.
Awesome, now to create the "home" for each website. Inside your pages directory, create a folder for each of your websites matching the name provided in the Krabs configuration file.
Note: _app and _document pages are common to every website.
To test out that everything is working, you can create an index.js file with a simple "hello world"-function for each of the websites.
To see the result run: node server.js
If everything is working correctly, you should now be able to view each website using the URL you entered in your hosts file and Krabs configuration.
Next, let's create our connection to Enterspeed. Create a file called enterspeed.js
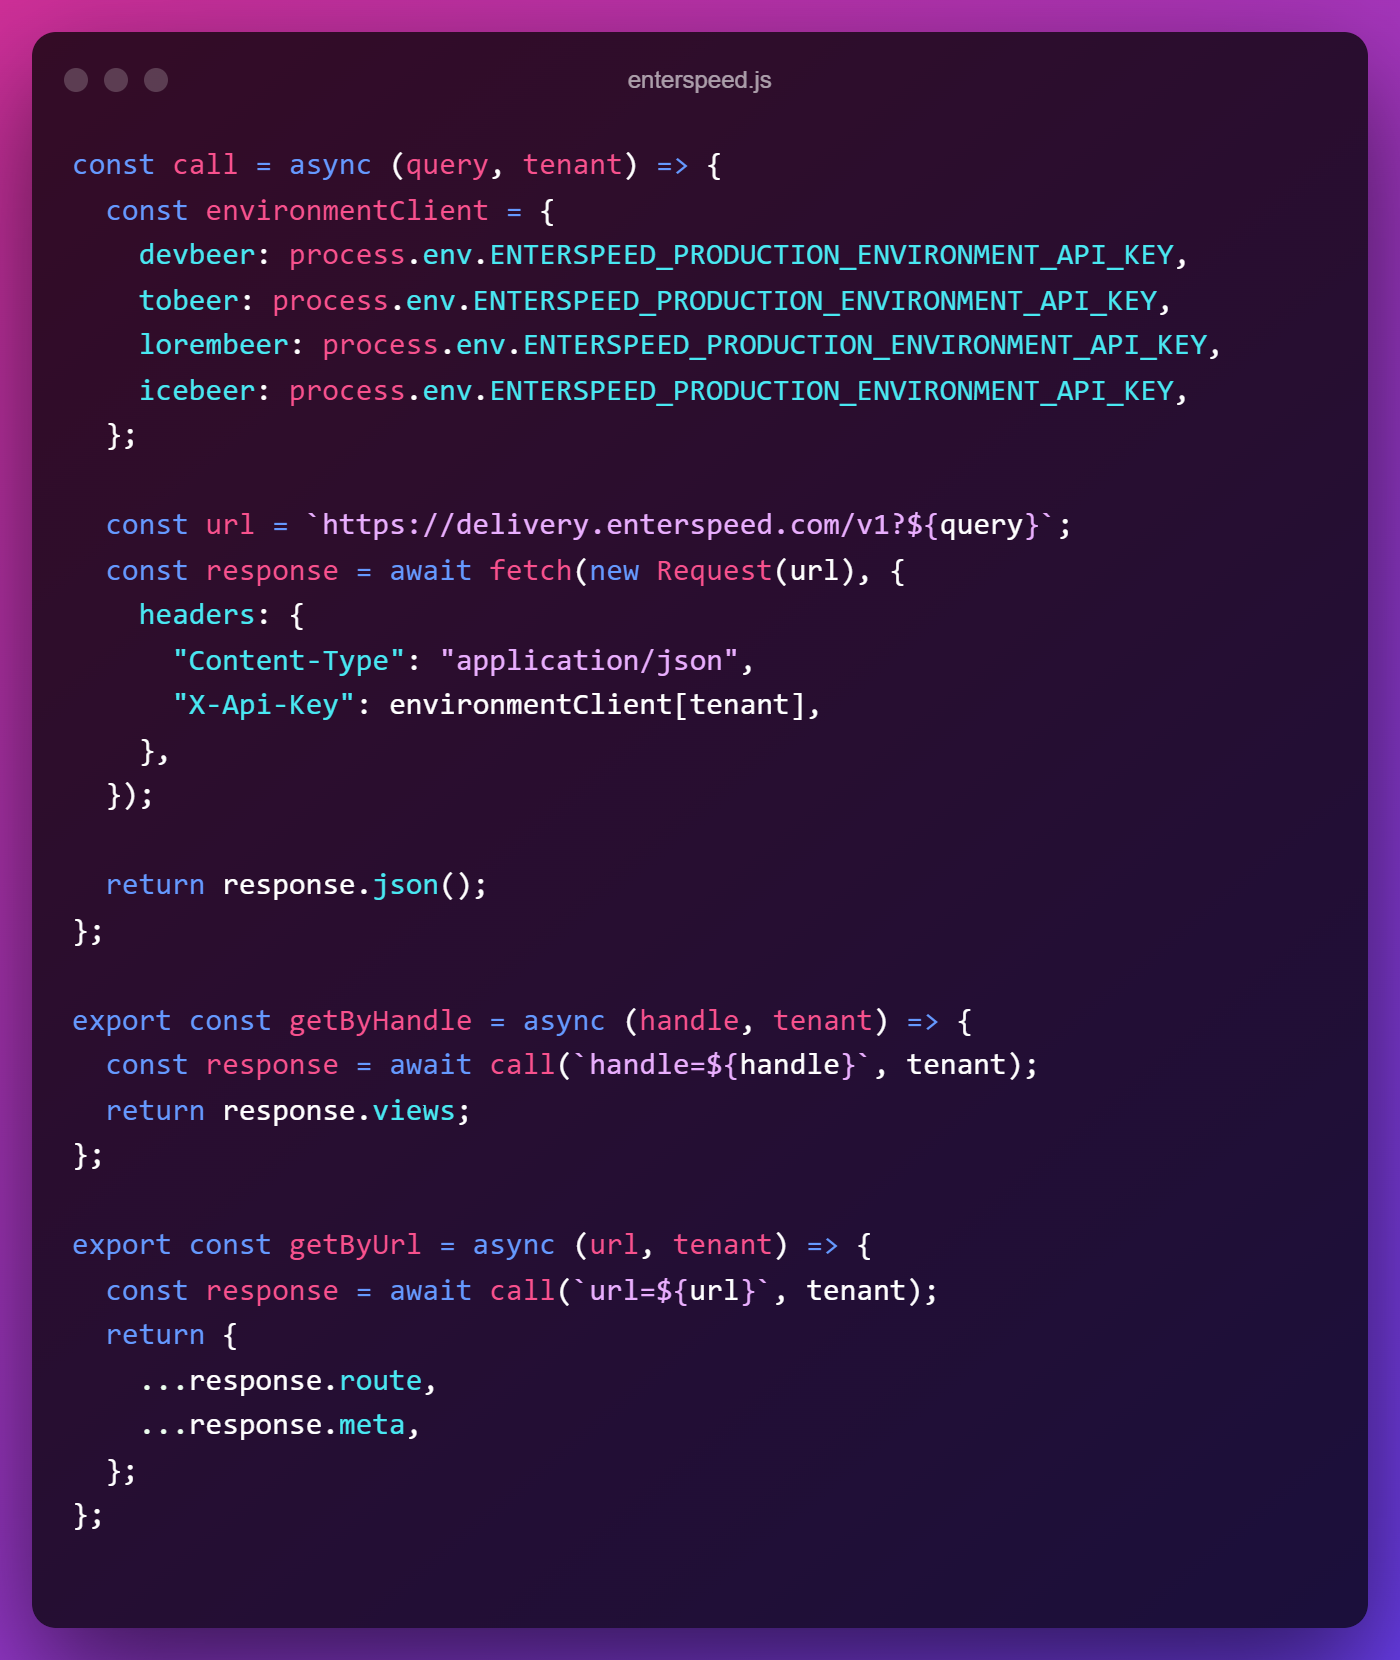
We have a call function and a function for each route type: getByHandle and getByUrl. You will notice that we in the getByUrl function have extended the response with meta, that way we can correctly handle 404-errors. Each of the functions calls our call function with a handle/url and a "tenant" (the website name configured in Krabs).
The reason why we include "tenant" is so we can differentiate between our websites and use a different environment client for each - if we choose. In our example, we have simply used the same.
Next, create an _app.js file in the pages directory. Here we will get the tenant name (website name), the enterspeedDomain, and also fetch our navigation.
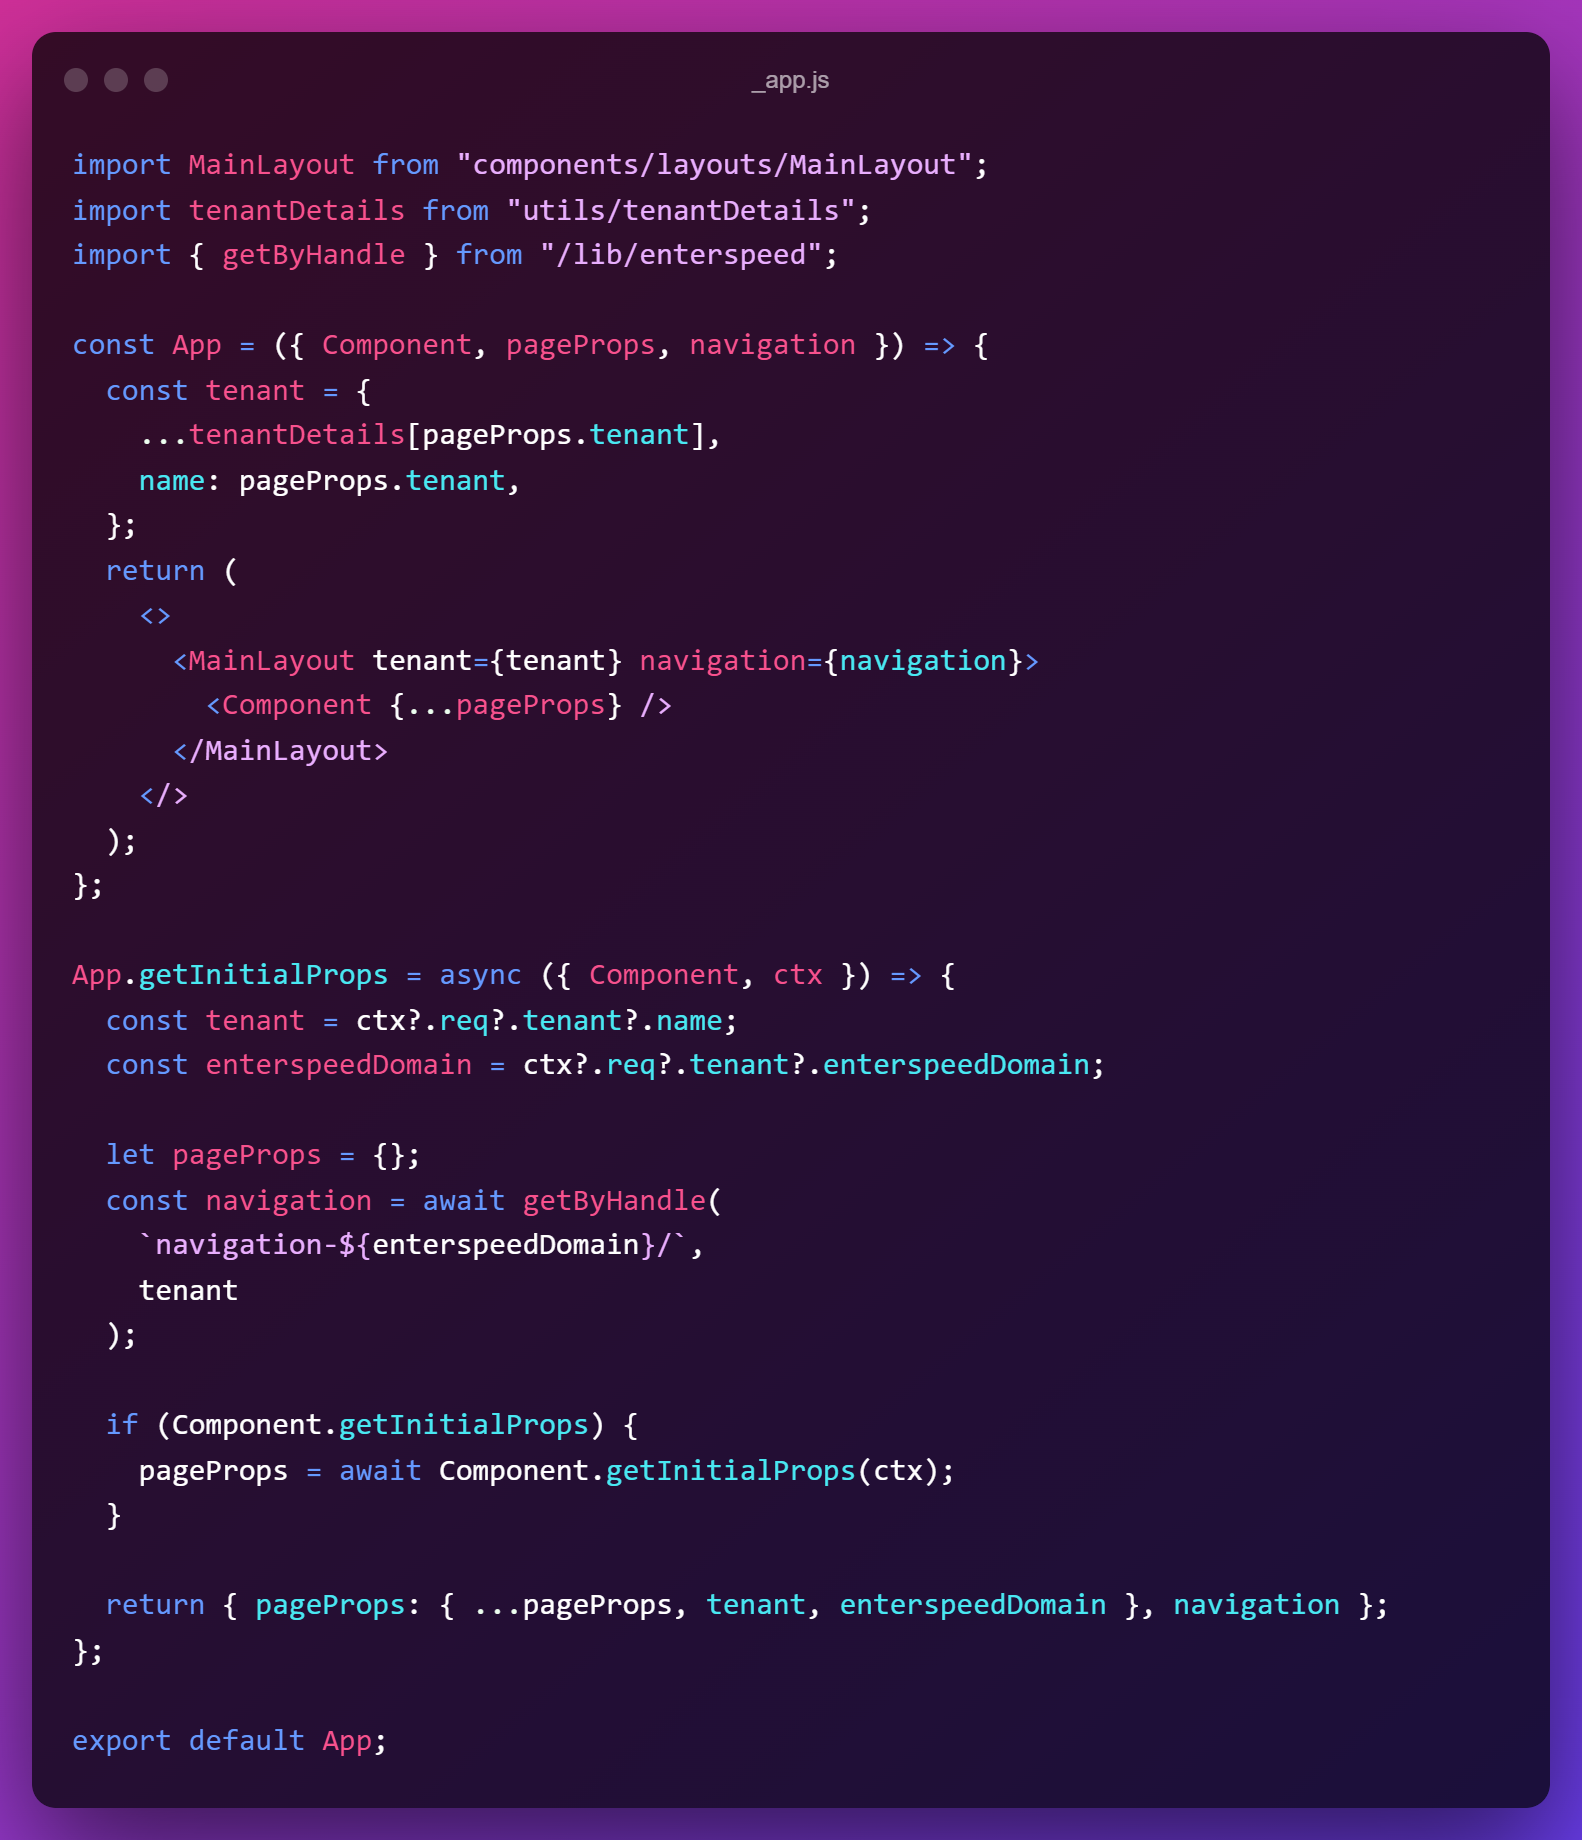
In our App.getInitialProps you'll see we fetch the navigation via getByHandle and we add the ${enterspeedDomain} to the name, which matches the route name we created in our navigation schema in Enterspeed.
The tenant and enterspeedDomain are then added to the pageProps, which gets returned alongside the navigation. These are now available in our App function.
In our App function, you'll see we expand the tenant object to also include something called tenantDetails. This is simply some extra layout configuration we've added, which also could have been done in Umbraco. This is just to show how the front-end developer could do this if they didn't have access to the Umbraco instance.
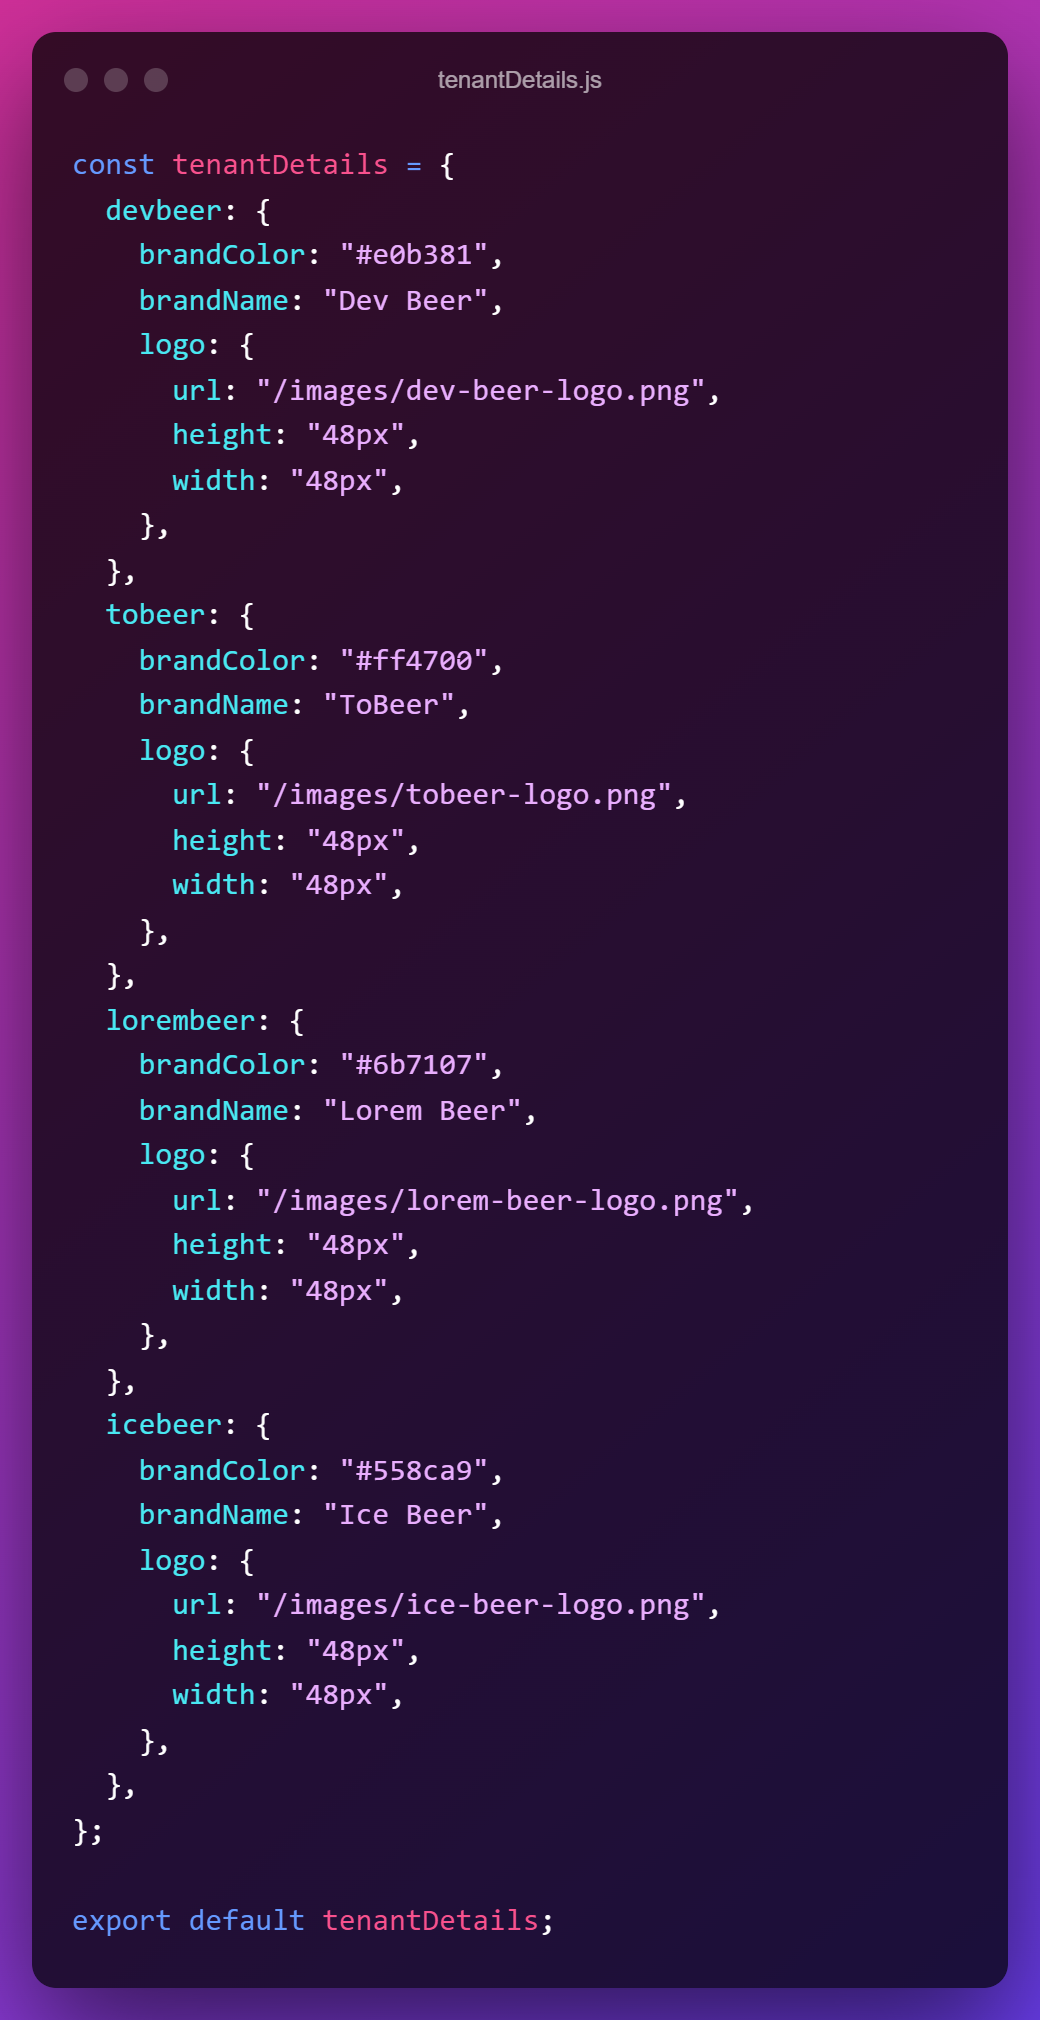
We've chosen to add it in a separate file and not the Krabs configuration, so as to not mix layout specific into the Krabs configuration.
Lastly, we wrap the App Component with a component called MainLayout, where we pass tenant and navigation as props. Let's take a look at that component.
We've made a simple layout, based on the awesome UI framework – Chakra UI, but here's the neat part. We could have used a completely different UI framework/library for each of our sites – without hurting the main performance.
Yes, you read that correctly. Talking about bringing power and flexibility to the developer.
No more internal battles between developers on which UI framework/library to use. No more trying to argue if Tailwind CSS is pure evil or not. Just like an old Burger King commercial, everybody gets it their way.
You are now able to choose the UI framework/library that best fits the use case.
We can achieve this by using Next.js' Dynamic Import. In our _app.js file, instead of using the MainLayout component, we could have used a unique component for each website, based on the tenant name (website name). This could look like this:
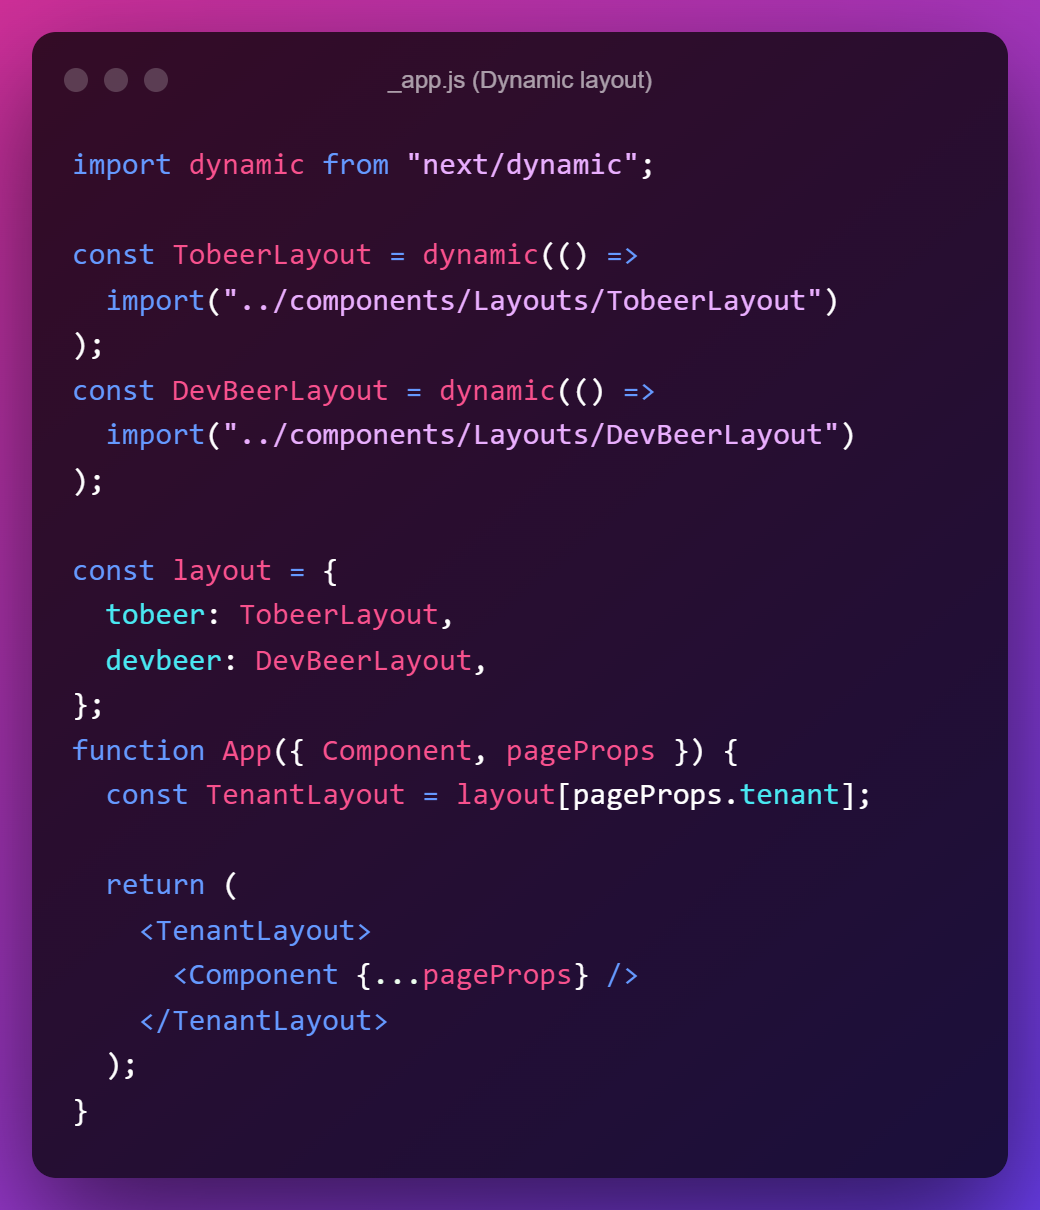
Now, let's look at how we could set up the pages. We're going to use Next.js' Dynamic Routes – more specifically their Optional catch all routes. This will allow us to catch all routes and match them with the corresponding view in Enterspeed.
Inside each of your website folders, create a file called [[...slug]].js
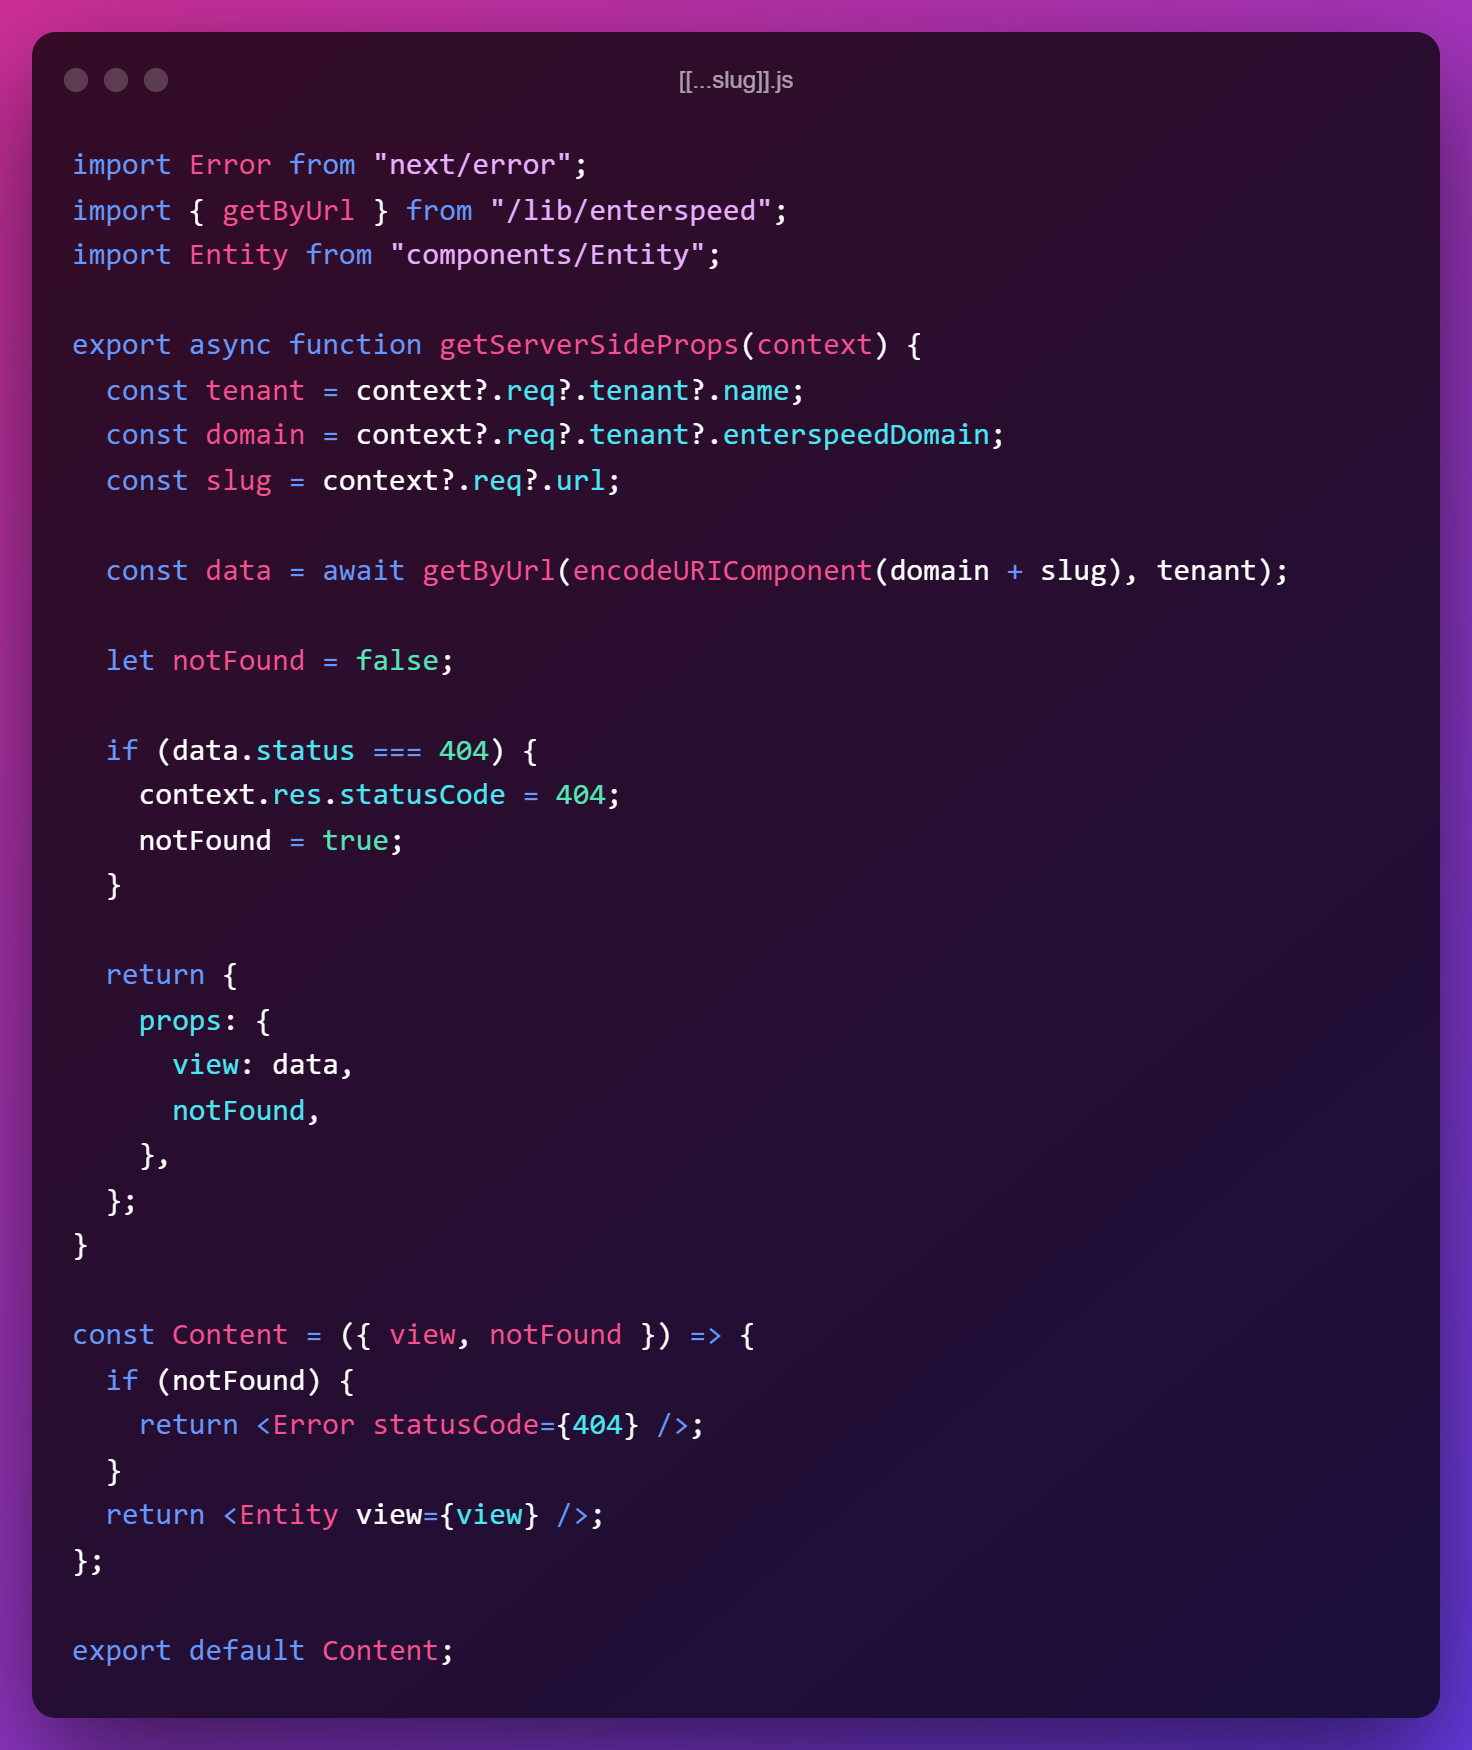
In our getServerSideProps function, we hook into its context and grab the tenant, domain, and slug. We pass these three variables on to the getByUrl function we wrote in our enterspeed.js file, which we set as our data variable.
We then check to see if data.status is equal to 404, if so we change the statusCode in our response object to 404 and set our notFound variable to true.
The data and the notFound are then returned as props.
In our Content component we check to see if notFound is true, if so we use Next.js' Error component, if not we return our custom Entity component.
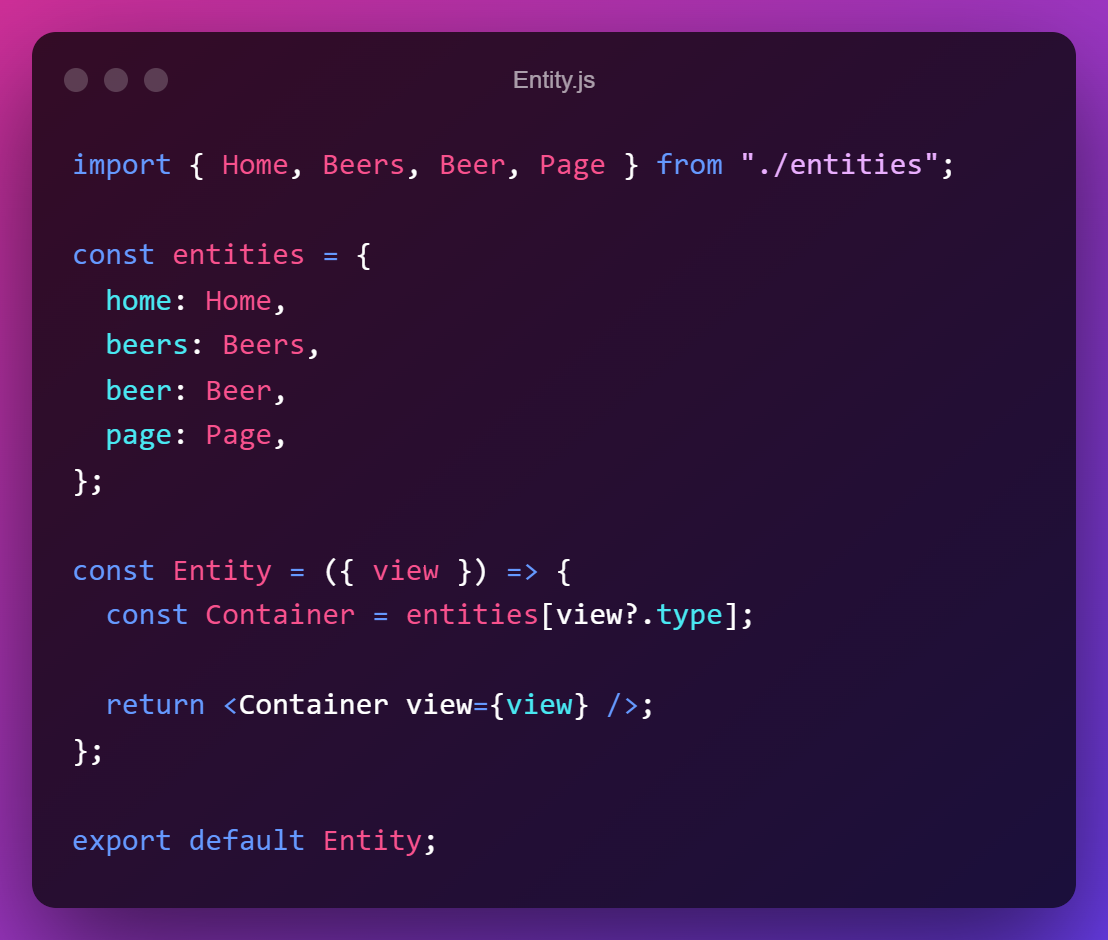
Our Entity component is responsible for rendering the correct components, based on the type we defined in our schemas earlier.
You may be thinking: "Hmm, but what if I want to have a custom layout for just one specific page? Should I then create a whole new schema with its own unique type?"
Nope. Next.js got your back. Predefined routes always take precedence over dynamic routes.
This means if you want a unique layout for your Contact page, you simply create a page called "contact.js", and this will now respond to domain.com/contact.
Well, to round things up, let's look at how we would use our data to display a list of our beers.
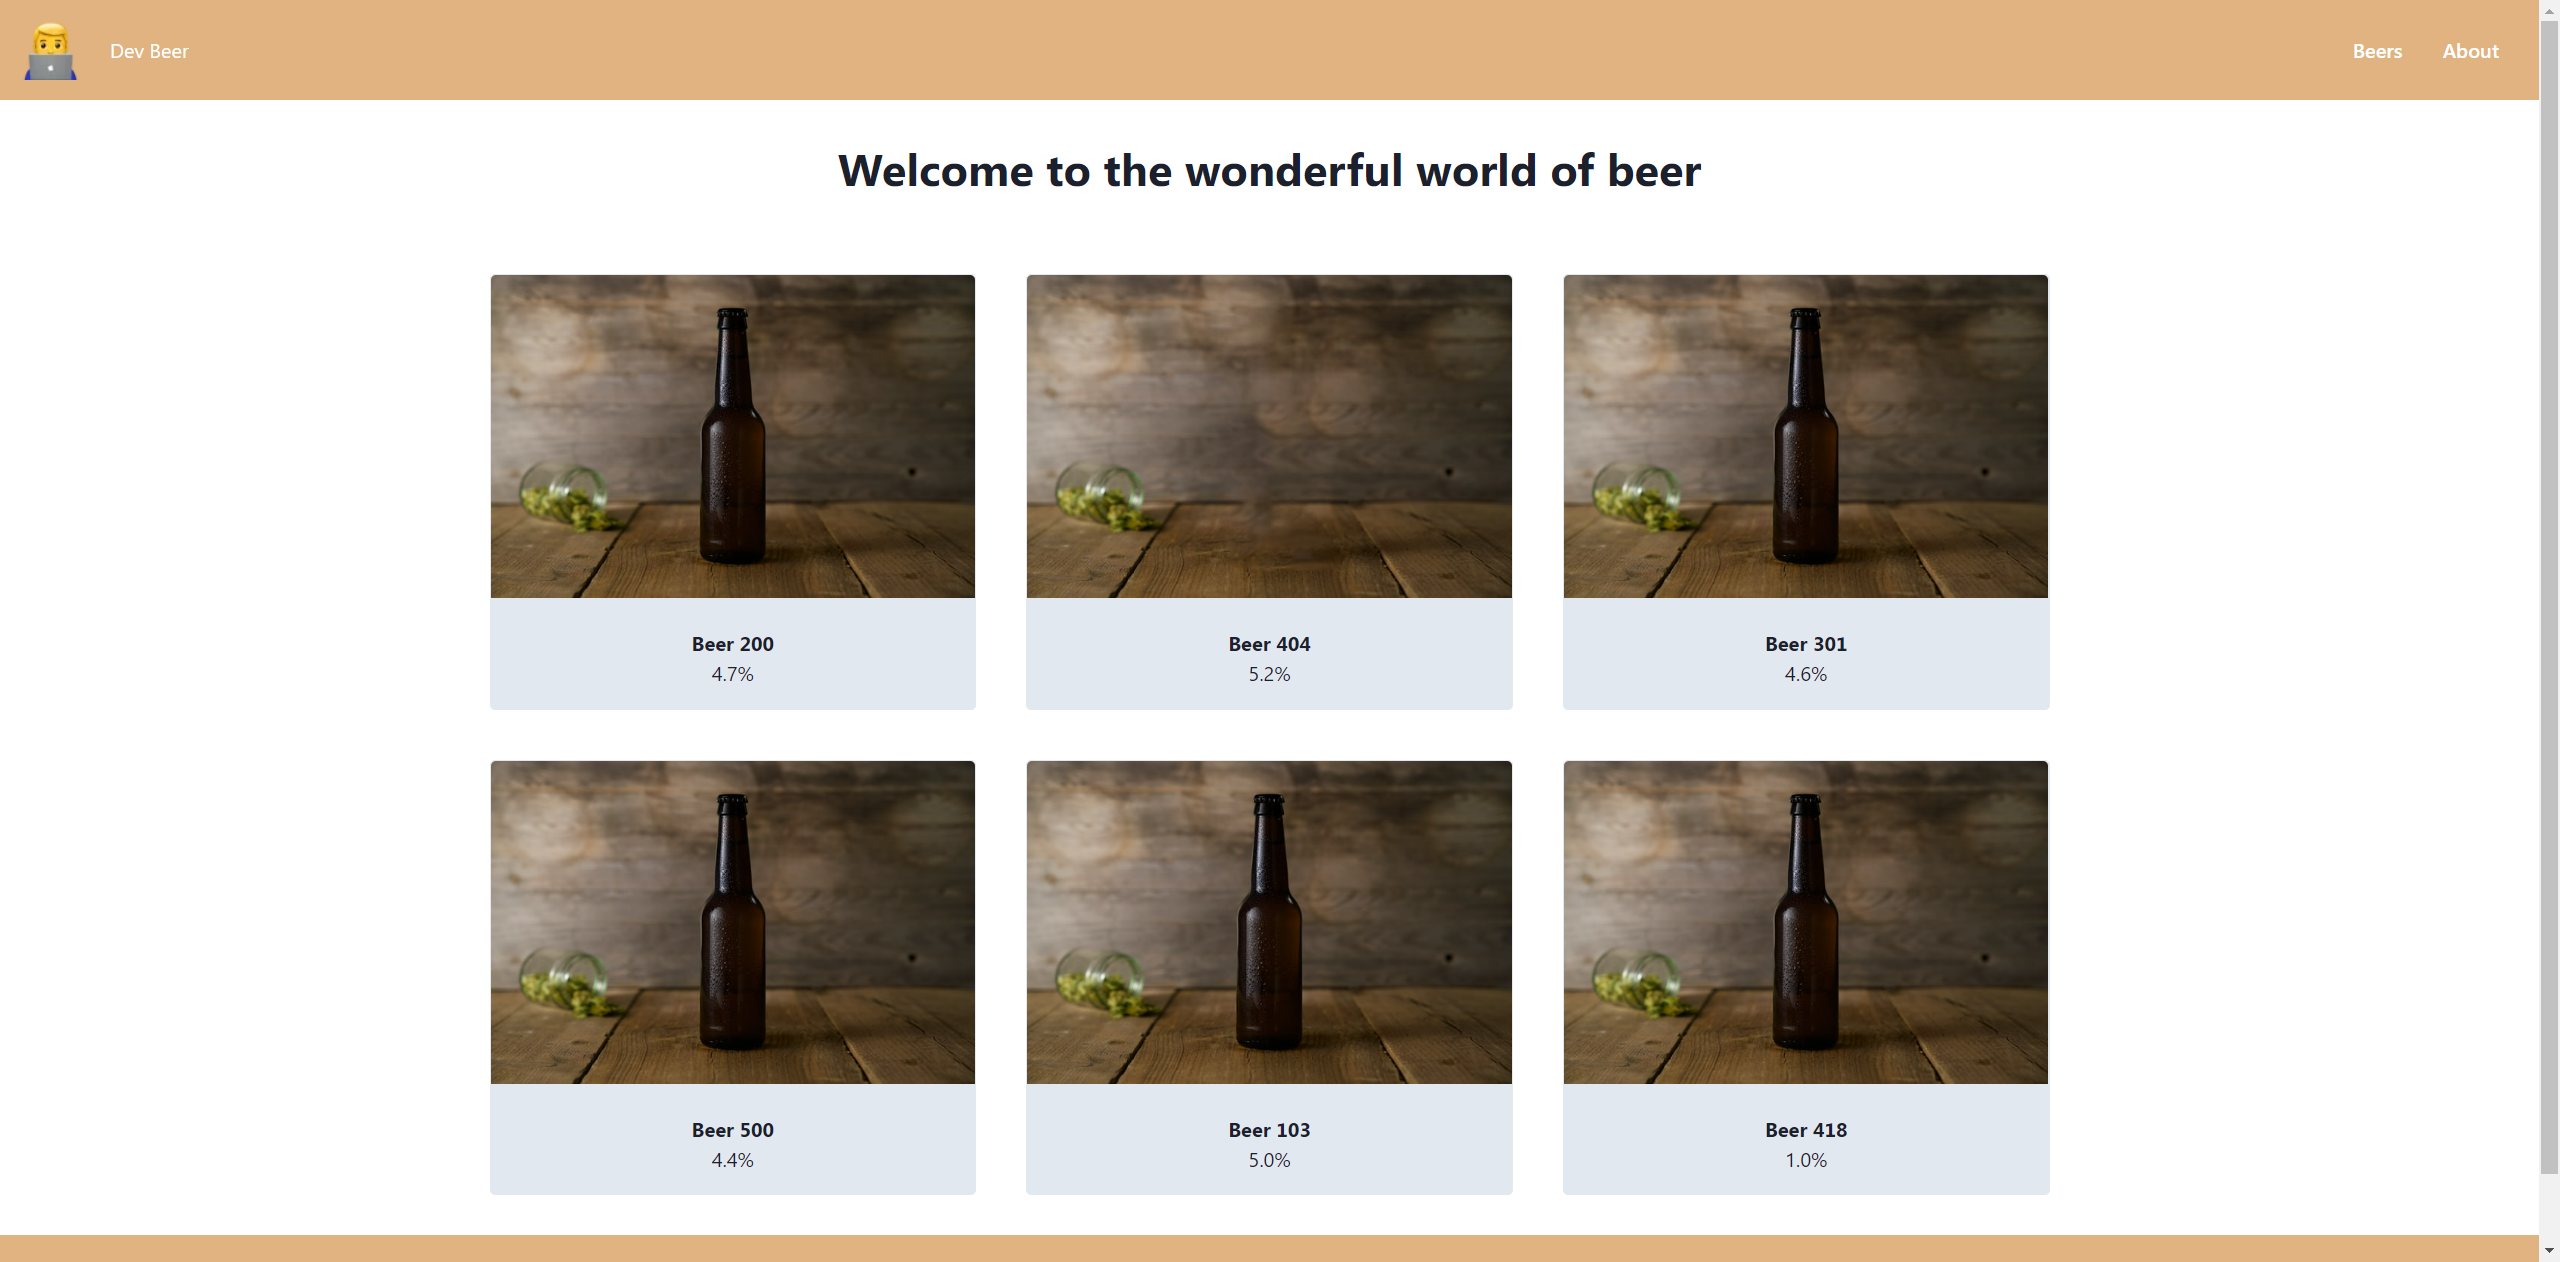
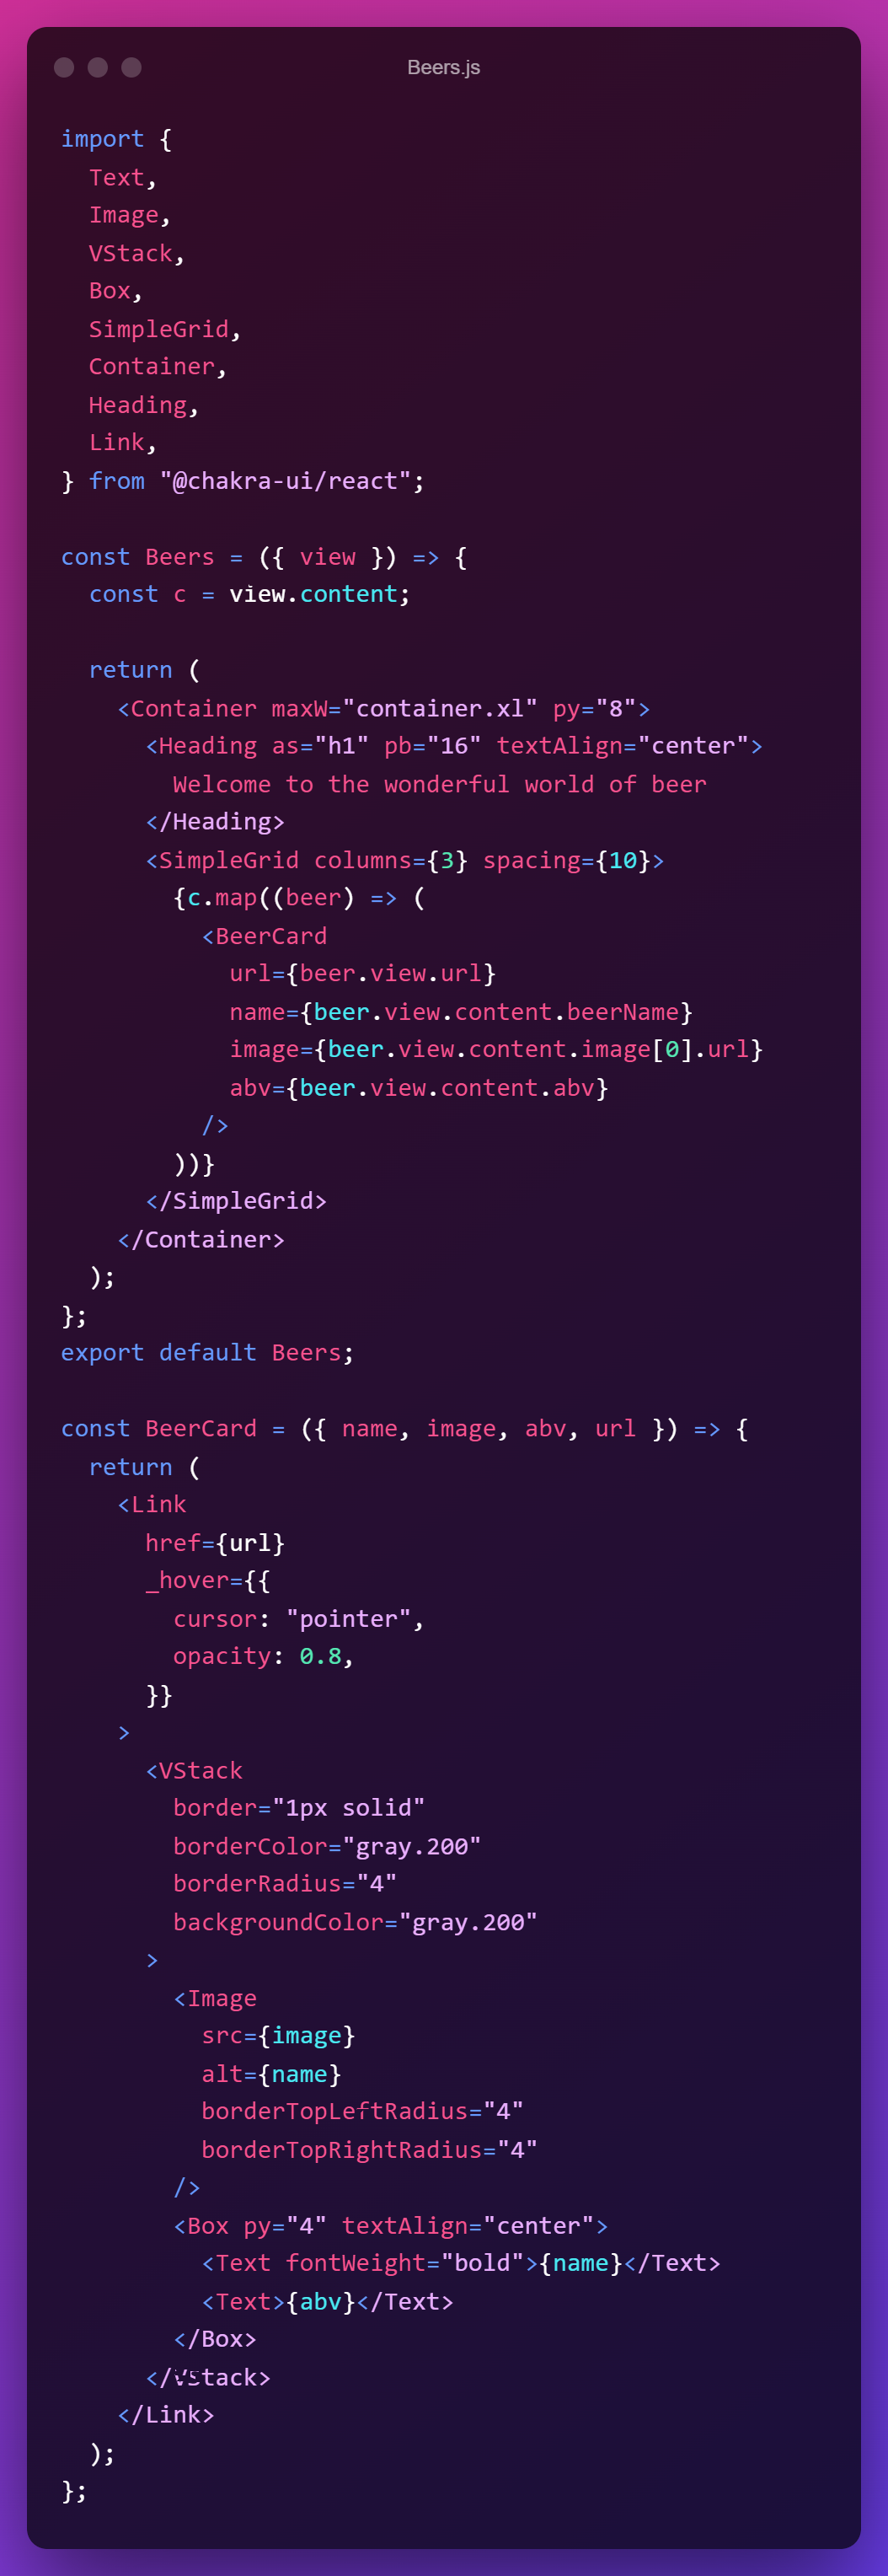
All of the data has been passed to the view prop, so all that is left is to map over our array of beers and render them in a nice grid view, which will look like this:
The code, which is based on Chakra UI, could look something like this:
That's it. We hope you enjoyed the article and it provided some inspiration on how microsites can be used.
Cheers 🍻

Loves optimizing and UX. Proud father of two boys and a girl. Scared of exercise and fond of beer.
© 2020 - 2026 Enterspeed A/S. All rights reserved.
Made with ❤️ and ☕ in Denmark.