Product
Playing with Enterspeed and Commerce Layer

Jesper Weber
Senior Software Engineer at Enterspeed
In Enterspeed, we have quite a few use cases, but it’s especially in composable and headless setups that our Content Federation Layer shines. Luckily, Enterspeed is not the only tool working in the composable and headless space. Commerce Layer is another great example and one that fits really well with Enterspeed.
Commerce Layer has a statement saying that “Headless commerce doesn't have to be hard” and we fully agree on that. So, we decided to try the tools out together 🤓
To try it out, we first take an existing content site built on Enterspeed. The site has products, but only for presentation – there’s no basket and checkout flow.
In Commerce Layer we begin completely from scratch by creating a new account.
Once the account is created, there are a few things that you need to set up in Commerce Layer, such as a merchant, a stock location, an inventory model, a market and so on. This is typically a one-time thing and Commerce Layer has a nice checklist with the things you need to set up.
Once the necessary steps on the checklist are completed, it’s time to add the SKUs and prices in Commerce Layer. Now, Commerce Layer is a flexible commerce engine that doesn’t try to be more than it should be. As an example, it handles everything about basket calculations and checkout but the products themselves don’t need to be in Commerce Layer, only the SKUs and prices.
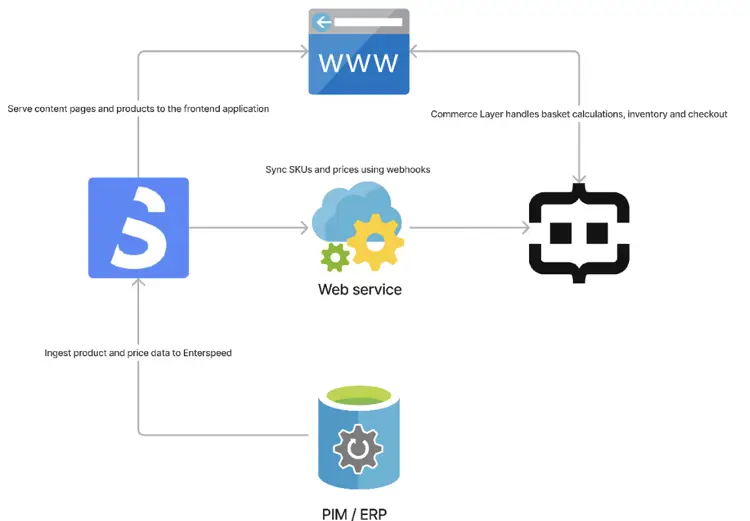
This means that we can utilise The Enterspeed Delivery API to serve the products fast and easy together with the rest of the content from e.g. the CMS.
But as mentioned, we still need to sync the SKUs and the prices. To do that we can use webhooks in Enterspeed.
Thus, every time a product or a price is created, updated, or deleted in Enterspeed, we get a notification-request, and we can create, update, or delete the specific SKU or price on Commerce Layer.
A simple .NET minimal API example of the flow in the webservice could look something like this.
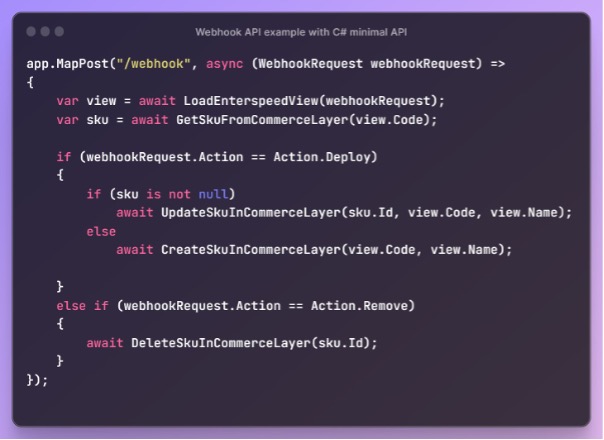
Loading a view from Enterspeed is easy, as the webhook request contains the entire URL you need to call in order to get the updated view that triggered the request. You just need to provide the Environment Client API Key in the header.
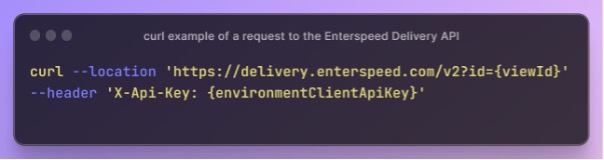
If you are working in a .NET application, you can also use our .NET Delivery SDK making it even easier.
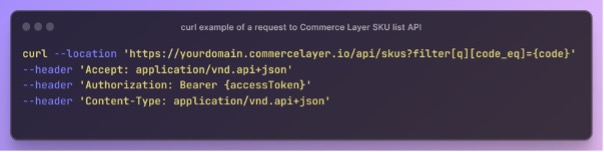
For Commerce Layer, they have APIs to do all sort of things, of course including APIs to create, read, update, and delete SKUs and prices.
This is an example of how to fetch a SKU by its code if you don’t have the id.
With the above approach, the dataflow will look something like this.
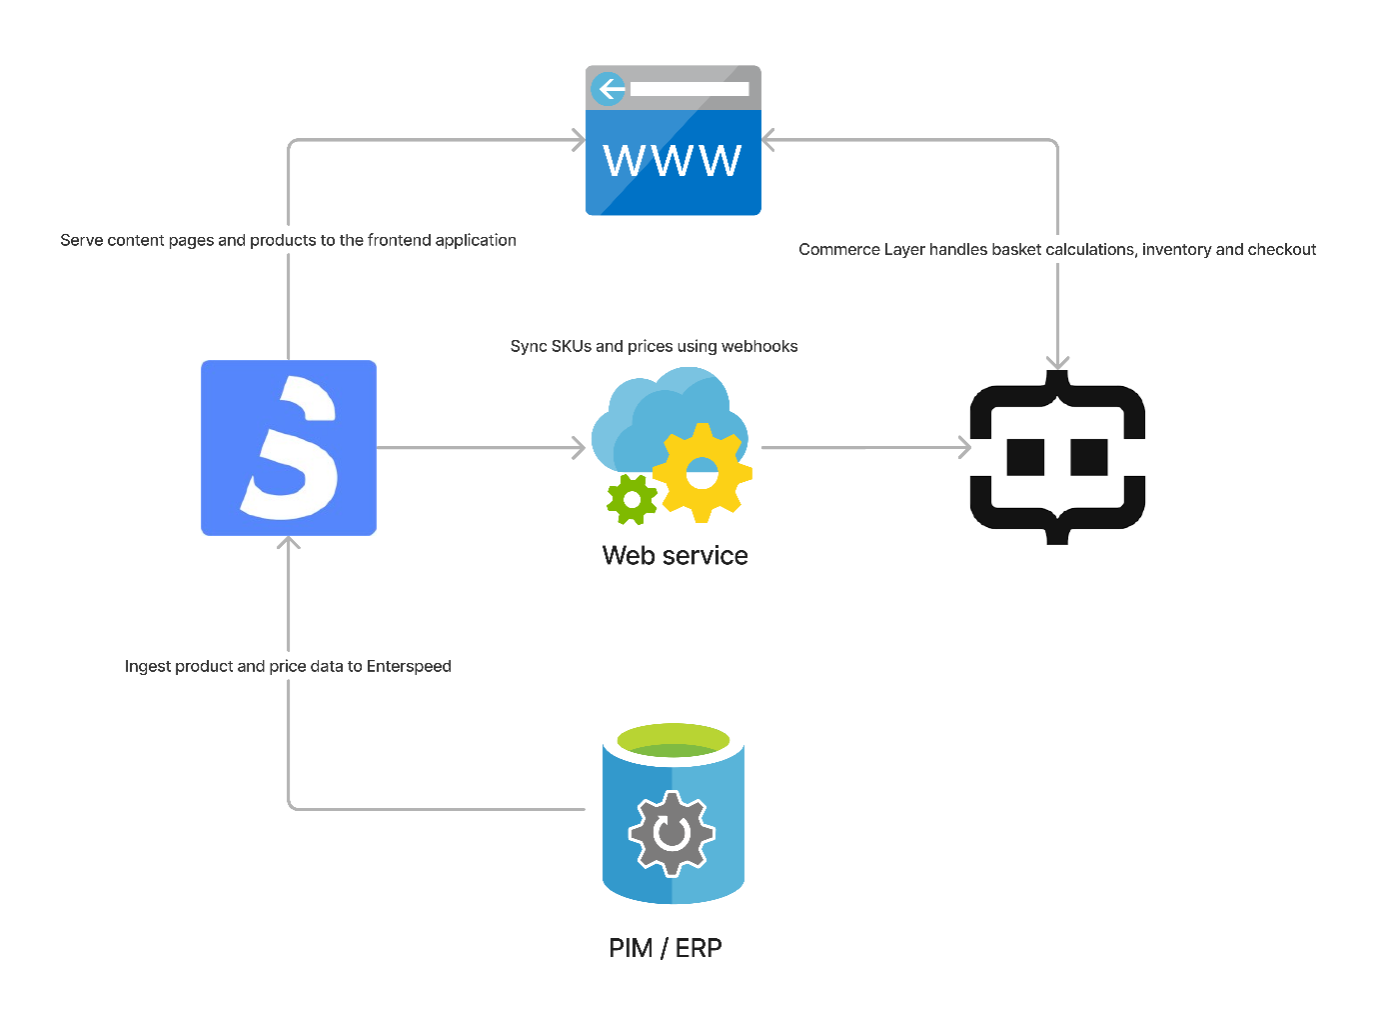
This way we only need to build a small and simple web service to sync the items one at a time, rather than a full integration between the PIM or ERP system to Commerce Layer.
And who knows, maybe someday we’ll build a direct integration between Enterspeed and Commerce Layer using Enterspeed Destinations 😉
With the dataflow in place, we can now start updating the frontend and add the basket functionality.
The first thing we need to investigate is authentication so that we can get an access token. Here, Commerce Layer offers a small NPM package with a JavaScript wrapper to help you use the Commerce Layer API.
Once the authentication was in place, we could add an “Add to basket” button on our products.
As mentioned, we already have products on the site and they’ll still be served by Enterspeed using our high performance Delivery API and rendered in a React application. We want to load the prices from Commerce Layer and not Enterspeed, as Commerce Layer holds the prices that’ll be used in the basket calculation.
To render the price or any other commerce components, Commerce Layer has a nice React component library that you can use to get started or simply just to get inspiration from.

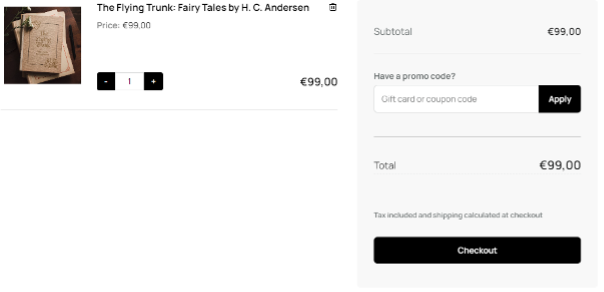
Below is a screenshot of our product with the new Add to basket button 😊

The last part is to add the basket page and once again you can use the React component library to help you render the basket. In our case, we don’t want to implement the entire checkout flow. Instead we take the lazy approach and simply add a hosted basket provided by Commerce Layer 🦥
This is just a simple setup, but it gives an idea of what a setup could look like – and it proves the point that Enterspeed and Commerce Layer works really well together in a composable and headless setup 🚀
Loves building software that makes an impact on businesses. Untalented but happy ice hockey player (the beers just taste better in a locker room after a game...)
© 2020 - 2026 Enterspeed A/S. All rights reserved.
Made with ❤️ and ☕ in Denmark.